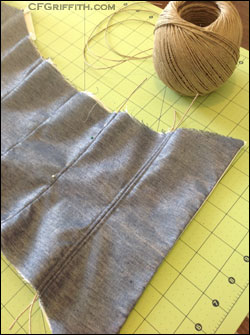
Adding cording to the seams to help keep the seams from buckling too much. See more photos below.
Patterns Used:
– An old online corset-drafting pattern (doesn’t seem to be online, at least at the old URL).
– I made an underbust corset from the aforementioned pattern as one of my first sewing projects. There was a fitting error on the upper edge of the first version, and it was also a rushed, Halloween costume piece with inferior materials. I fixed the pattern for a better fit this time around.
Materials Used:
– Blue cotton(?) and silver fabric from Joann Fabrics.
– White, thin, but stiff fabric for the base (sorry, can’t think of what it is offhand — interlining).
– White Sew Essentials Cotton Muslin from Joann Fabrics (lining).
Other Supplies Used:
– Hemp cording.
– Plastic zip-ties.
– Silver grommets (size 00).
– Regular white and blue threads.
Hand and mostly machine sewn.
As I mentioned above, when I first started sewing, I made a corset for a Halloween costume. It was a fun one-time piece, but I’ve never worn it since. I have always wanted to fix the pattern and test a few other materials out. I needed an accessory to fix up another old outfit, so I dug through my stash and found everything I needed for this lightweight corset.
I say lightweight, because it’s not built for waist-reduction and strength. The grommets are the main “good” item in the whole thing, and I apologize that I can’t remember what the main strength fabric is. Even that feels a little lighter than what I normally use, but we’ll see how it holds up over time.
The outer fashion fabric is not only too light, it’s almost see through, so I flatlined it to the interlining fabric with a serger and treated them as one piece. I also made the lining, then sewed them as two separate pieces, put them right sides together, sewed at the outer edges, and turned rightside out. I stitched along the seams to attach them as well as create the first “wall” of a boning chamber.
I then used a zipper foot, and placed cording along each seam (one on each side — except the center front, and center back). After the cording was finished, I used plastic zipties for the center front and center back (four total). If I had more time, and especially had metal boning, I would have added another line of boning (see added text below) on the other side of the grommets that were then placed along the back edges. I only had so many of those left, so I only used twelve total.
The very last thing was binding the edges. I wanted it to be in the fashion fabric, but since it was so thin, I also cut more of the white cotton lining. I tend to be a little lazy with my bias strips, so I merely pressed them once in the center together. No stitches holding them together, just the good press and carefully pinning the first side for machine sewing. I then flipped everything over and handsewed the other side down.
I have no idea how it will be to wear this — I wanted it to be lightweight and comfortable for a generic and quick elf costume. Just a little something to lighten up a drab and boring old gown I want to get a little more use out of.
I’ll add more photos of the outfit together when I get them, along with my thoughts of how it held up during the event.
Edited to add 5/1/14:
Shortly before the event, I decided to go ahead and add a second line of boning — so there are now two rows of boning (plastic zip ties) on each side of the metal grommets. The plastic zip ties are somewhat bulky, so I wasn’t sure how this quick and light corset would react, but I just felt better going ahead and doing that. I simply sewed another line to start the first side of the boning channel, then using a seam ripper, slashed a big enough line in the lining to squeeze my zip tie through. Cut and filed down the edges so they’d follow the shape of the top and bottom, and used the zipper foot to sew the other side. I quickly whipstitched the fabric closed, and if I ever feel inspired I can put a better patch over the hole to keep the zip tie from back out of the channel and poking me.
As far as how the corset held up, it was about what I figured it would be. I wasn’t sure if I would be comfortable, so I had it laced a little looser than I probably should have (it’s been a while since I’ve costumed, and I was already feeling a little hot and uncomfortable). The plastic zip ties on the back were fine, the cording on the seams did an okay job. The plastic zip ties on the center front were a bit weaker than I would have liked. At the same time, while it shifted, curved, and moved around a little, it was still a bit comfortable. So, for a very quick costume accessory that you don’t need for heavy structure and you just happen to have the supplies handy, it works.
There is still a little work I want to do to this pattern (I need to shave a little more off the bottom edge of the front seamlines… it was just a little more room than I needed, and it may have been a little too tall, but I’m not sure if it slid up on me either), but at least I’ll know for future versions that it’s almost where I want it patternwise.
Photos:
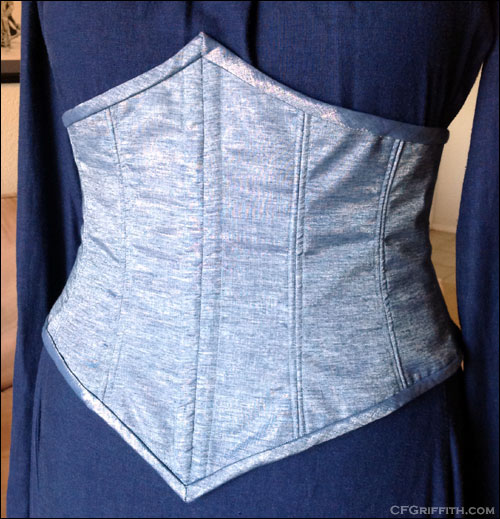
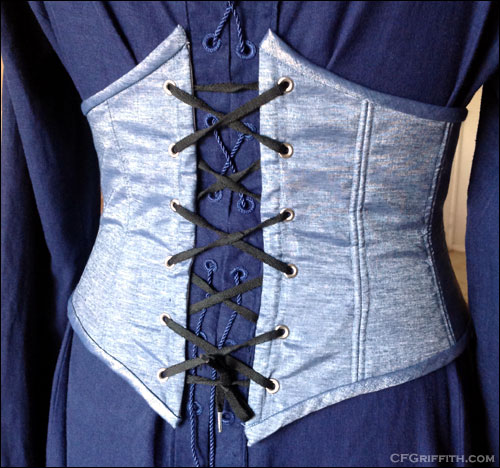
One of the reasons I wanted to make this is because it added a little bit of interest and sparkle to a dark-colored and simple gown, but also because I have never liked the way the back closed on the gown. I still need to buy lacing for the corset, so this is a temporary lacing for the photo. I also ended up tying two of the black shoelaces together (small bow on the top, the bigger tied bow on the bottom) and using that for my lacing.
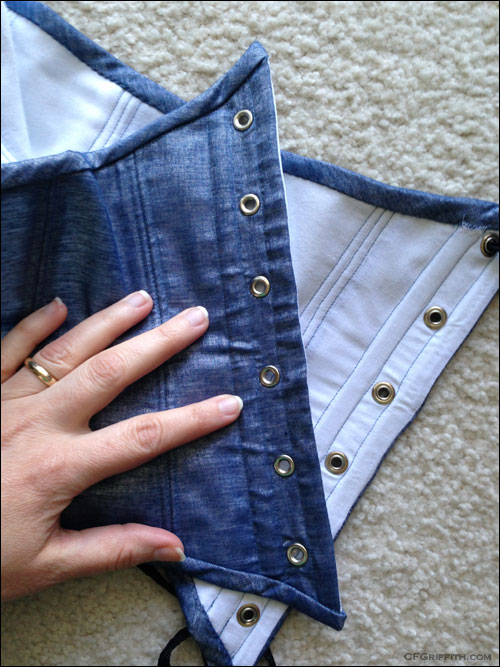
Showing where I added another line of plastic zip tie boning on the other side of the grommets for a little extra support. I sewed one side of the channel, slashed the very top of the lining to slide the boning in, sewed the other side, and did a quick stitch up job. Later, I may add a sturdy patch to keep the boning from poking out of the fabric/stitches.

