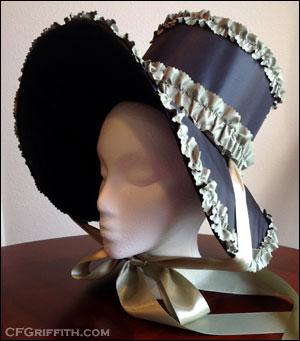
My first Regency Stovepipe Bonnet, made from scratch (no patterns), based off a few fashion plates. See below for more photos.
Patterns Used:
– None.
– See the Gainsborough Hat page for photos showing progress I did not show for this bonnet.
Inspired By a Few Bonnets and Hats:
– This back view.
– This front view.
– The lower left black bonnet, with green gathered trim.
Materials Used:
– Black taffeta (not silk).
– Buckram (light? from Joann Fabrics).
– Light flannel shirting? (from Joann Fabrics).
– 16 guage craft wire.
– Regular black thread.
– Aleena’s Original Tacky Glue.
– Satin, double-sided 1.5″ sage ribbon.
– Pinked strips of sage fabric (same as the K Gown’s fabric).
– China silk lining.
– Satin, double-sided 1/4″ white ribbon for drawstring.
Other Supplies Used:
– Posterboard to create pattern.
– Compass with pencil (for the top of the crown).
Hand and machine sewn.
Disclaimer: I am still not using proper millinery supplies, and have only read a few tips and hints online about how to make hats and bonnets. This is mainly to document my quick experiments.
Well, here I go again… I picked an item, without settling on one single design. It almost got me in trouble this time, and I had to ask some friends if I should bother trimming it once I’d finished it. Not only was I unsure if I had just created a not-even-close bonnet, but I freaked out when I tried it on and saw how I looked in it (with no other costumes or accessories… I’m not used to Regency yet). Thankfully, they encouraged me to finish it and give it a try.
The design is based off a few fashion plates I was looking at. I was in a big hurry and wanted to make something for my head (because apparently I have now decided it’s more important to start with a hat than the gown or anything else lately *laughs*). I admit, I was not doing as much research as I should have, and was torn between what I’ve seen of most Regency stovepipe bonnets, and similar straw hats that are shaped like mine.
I used similar construction and supplies on my Gainsborough hat. There were some changes, however.
This is smaller, so I didn’t need to double the buckram. I also did not need as many lines of wire. I used a lighter flannel, instead of a thicker felt. I also changed the construction order.
The Pattern
First, I took posterboard and determined a shape for the stovepipe part of the crown. I went back and forth a little, wondering how much bigger to make the crown so I had enough room, but not so much that it would be too big. I also kept getting nervous about how tall the stovepipe part was.
Once I finished that part, it was the brim shape next. I plopped the stovepipe onto the posterboard, marking a centerline, and using a ruler to determine how long I wanted the brim to be in each section, I drew the shape free-hand. I actually did lightly draw both sides, but I picked a side I liked best, folded on the center line, and cut so my favorite so both would match.
I had actually forgotten at first about head shape since I was working quickly, and also did not have a way to transfer how the posterboard stovepipe fit on my head to the brim. I mainly wanted to see if I had made the brim just fine though, and taping the seam allowance of a round brim hole to the stovepipe while even gently folding the sides down was an annoying experiment. I ended up making a second brim, adding a little more to the back, and that cut a little of the front down. More on that part later.
Buckram and Wire
I started making the buckram frame for the crown first so I could get an actual head shape for the brim’s hole. I cut my pieces out, and this time I was very careful to cut the very top as close as possible to fit the sides (vamp?). As I mentioned above, I only used one piece of buckram for each piece, and I did not serge the edges this time. I still marked everything carefully… front, back, seamline, top, bottom.
I used only the 16 guage craft wire this time. The top circle, and the top and bottom of the vamp were all wired. I whip-stitched the top to the vamp and then put it on my head. Craft wire is easily bent and formed, so this allowed it to shape to my head (and if I was careful, would keep the shape — I also made sure it was evenly formed to my head as best I could). I traced that shape out onto a bit of posterboard to help use that as a template for the brim and the fabrics — with added seam allowance, I was sure I wouldn’t accidentally cut a hole too big for the crown to fit on.
For the brim, I cut one piece of buckram for it and marked it as well (centerline, same as the pattern), front, back, top/bottom, and even the placement point from the back of the brim just to help remind me.
I whip stitched 16 guage craft wire to the outside by hand, overlapping the ends at the back. I flipped it over to the bottom of the brim, and using the template I’d made for where the crown would attach in the shape of my head, I traced where that crown would be going. I machine-sewed wire very close to this line (carefully, releasing the foot tension, on the widest zig-zag settings, gently encouraging the wire to move with the brim as it sewed, and while wearing safety glasses). I then, again on the bottom of the brim, marked a line in between the inner and outer wires, because I felt the hat could use just a little more support. That’s all it really needed, though.
Mulling
Two things changed with this hat. Since it wasn’t getting wired like crazy, I laid some flannel over the brim and decided to use that instead of the thicker felt. The next thing was this crown was not round all the way down — the top was round and the bottom has a more oval-shaped head opening — and I didn’t know if slipping a very tightly fitted taffeta over the crown would warp the fabric or go on so easily. So I had to sew the crown to the brim last.
I cut my pattern pieces out in flannel (the crown exactly how I’d cut out the buckram, only using seam allowances to close the tube of the vamp; the brim I left extra on the edges, marked the crown space and seam allowance, and trimmed the centermost part away). I used the glue to stick the flannel to the buckram frame, and I think I may need to change glues. I knew if you put too much with a thinner fabric, you might have leak-through and this would cause it to stiffen quite a bit. It’s just a pain to squeeze the bottle (especially when it gets low), and I was not as fond of trying to stitch through the flannel even where I was careful. I trimmed closely to the edge of the brim and anywhere else it needed a little extra trimming (being careful not to cut the thread holding the wire to the brim). The crown’s two pieces and back seam were whipstitched together for a little extra strength and shaping.
Outer Fabric
Next, I cut my pattern pieces out in taffeta, this time using seam allowances everywhere as needed (the center part of the crown was treated the same as the flannel). Crown first. The top was pinned smoothly on, and then the seam allowances basted on the sides. The vamp was whipstitched along the back seam, and to the crown top. The bottom seam allowance was pulled over the edge of the wire to the inside of the crown, and then I sewed that down to make sure nothing shifted.
The brim made me a little nervous, because while I had better luck covering the crown smoothly this time, I was nervous figuring out how to make sure I didn’t get tons of buckling on the brim (there is some, but I’m okay with it). My biggest concern was about keeping the inside in place, and fortunately, pinning around where the crown would go helped keep stable enough. I also pinned around the outside edges, placing the top and bottoms on the brim at the same time, trimming excess fabric from the edges, and then whipstitching it down all at once (being mindful of keeping my stitches within a certain distance from the edge).
I then took self-fabric bias strips (yay for having leftovers from the Gainsborough hat project) and sewed that around the outside edge of the brim.
The crown and brim were now completely covered, but separate.
Sewing the Crown to the Brim
Every time I worked with the crown, I made sure it had not warped, and I checked many times to make sure I understood where it was going before I started cutting away at the brim — the buckram brim still had its interior intact.
Since I had made the inside wire on the bottom side of the brim so close to where the crown was to go, I made some very light chalk marks on the top side of the brim to show where the crown should go/where the wire was without having to feel for it. I then placed the crown over that, checking measurements, to make sure I was happy with the placement. I took a sharp utility knife and cut an x in the middle of the brim’s buckram, and took some scissors, cutting the excess middle part out, leaving seam allowance.
I then carefully cut notches into all seam allowances so they could be bent up and sewn to the inside of the crown.
I will admit, at first I didn’t cut far enough in with clipping seam allowances. The hole didn’t match the crown. When the crown was halfway sewn on, I ripped the stitches out and started over after doing a better job clipping notches. I also discovered using the pinning through the layers thing didn’t work for the covered bonnet like it did on the buckram Gainsborough. So I tried something new. I basted at four points, front back and sides, to hold the crown to the brim without it shifting around. I also made sure that the chalkline on the brim was being followed — fortunately it was also starting to fade, so I never had to clean anything off (please be sure to check whatever you use on a test piece of fabric). The crown covered the line evenly since I had more control, so that also helped, and even if a bit of chalk had shown, I still had trim that could help cover small marks that didn’t come off.
Trying it on and Shaping the Brim
I finally was able to check the fit of the bonnet. I had allowed extra space in the crown to allow for the layers now sewn on the inside of the crown, but even working with lighter fabrics and watching the sizing, I still ended up with it being a little tighter than I wanted.
I very gently shaped the brim how I wanted it, and promptly dropped it on the floor, messing it up. *laughs* Fortunately, I just smoothed the wire back out and reshaped it. I will probably need to smooth and shape it whenever I put it on, but it’s fairly easy.
Lining
I have never bothered with lining the interior of the crowns in my hats so far — much of that is just not sure I could get it to look nice or stay put with the sort of buckram and other supplies I used. This time, I came across a really neat blog entry showing a drawstring lining and loved it. I had a very thin china silk, and used that to see if I could finish my bonnet and keep the edges of the brim’s seam allowance from getting all over my hair.
I really like the drawstring interior, in case I want to pull the lining out and sew through the buckram to attach something or change the lining. I only wish I had done a smoother job sewing it to the bonnet. It was towards the end of a long day, and I was running out of light.
Trimmings
I used wide sage satin ribbon for the bonnet ties. They are pinched together to create an interesting point, and that is stitched through the crown to anchor it to the bonnet securely. The trim around the base of the crown then covers the sewn-down end.
I originally was going to buy a few different widths of ribbon and gather that for the decorations, but hated how it looked when gathered. I still have tons of fabric left over that I have been using for various projects, so I used pinking shears to cut strips and make my own trim.
I admit I have a bit of a regret on this step. I originally planned to hand sew the gathering stitches, but at the last minute I panicked about how long it would take and used a sewing machine. I don’t have a ruffler foot, so the gathering was still done by hand. This is something I have never been fond of to start with, much less with skinny, long bits of fabric. I personally think (especially when you add in the time it takes for me to move furniture around to get to my sewing machine and set things up) it would have been quicker to sew them by hand, and I honestly think they would have looked nicer. I was practicing on some scraps, to see what widths and gathering lines to use, and I much preferred how those were looking. Ah well — lesson learned!
I was originally going to have two sewn-together white ostrich plumes going up the back seam of the bonnet, curling over the top. When I had it attached, I loved all the views… except the back. It just hid that wonderful stovepipe crown. So I took it back off and left it similar to the inspiration fashion plate’s trimming.
Sadly, I did not take as many photos of the process since I have already done that and I wanted to concentrate better on this bonnet.
Photos:
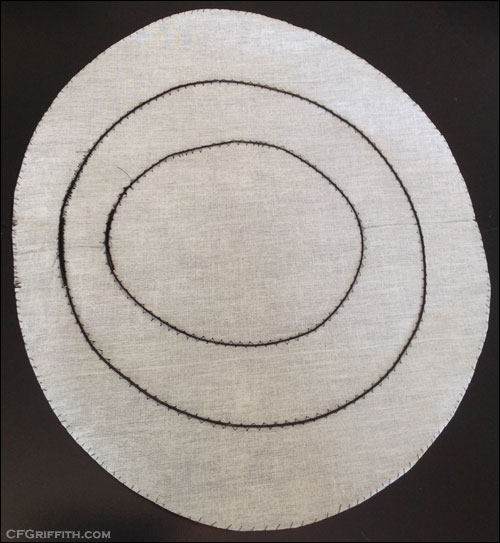
The brim, opening not yet cut out, with three wires sewn to help shape it.
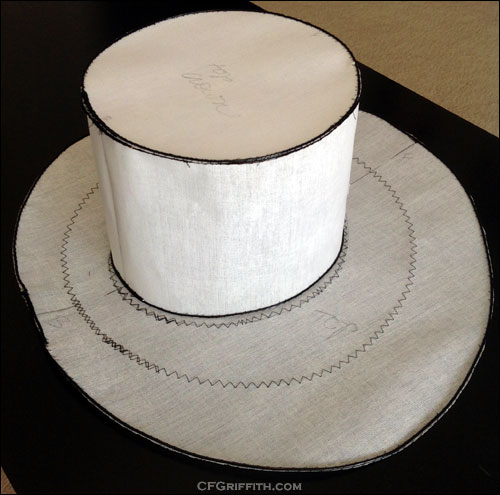
The buckram and wiring, but not sewn together yet. I kept checking the crown placement to make sure everything would fit together well enough and not get warped and out of shape.
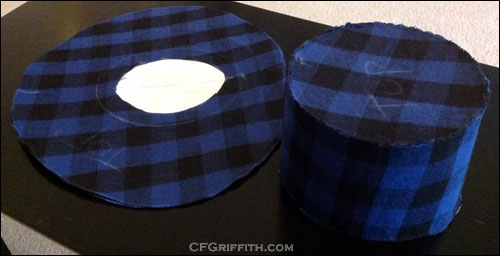
Since this bonnet was smaller than my last one, I used a lighter flannel I had sitting around to cover the wires and add a soft padding.
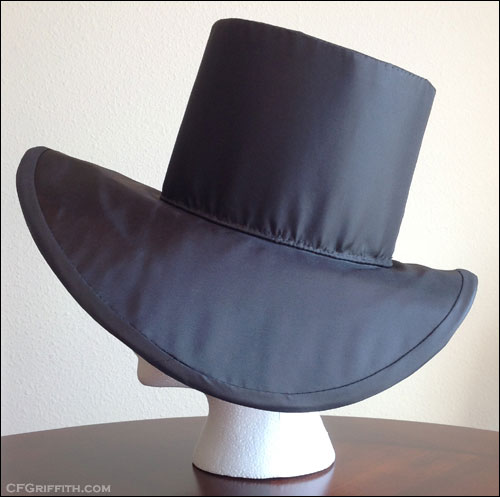
I didn’t take many construction photos (see the Gainsborough Hat page for similar techniques I used). This was before I started adding the trim. It’s not sitting at the right angle on the foam head — the bonnet is too big for it.
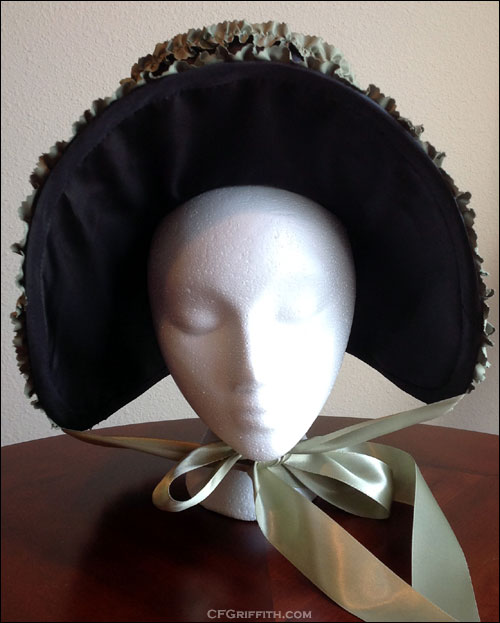
The bonnet, trimmed. I think it looks better on me, but I was unable to get photos of myself wearing it. Hopefully soon, and maybe with a costume.
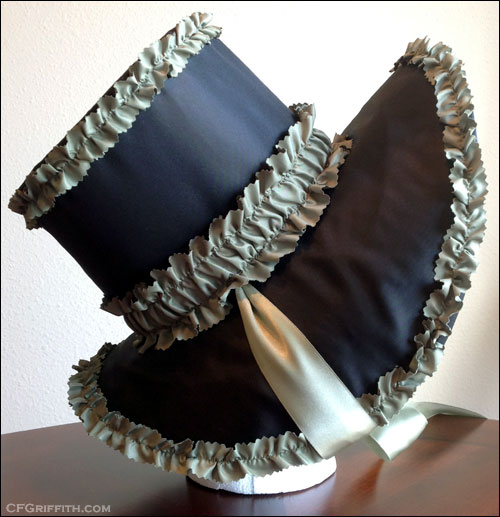
I used pinked fabric strips (non-silk taffeta), gathered to create a frilly trim. The bonnet ties are a similar shade of sage green satin ribbon.
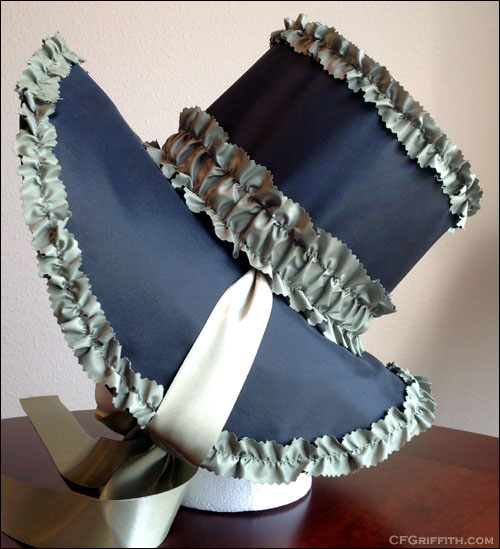
The colors are slightly off here — it’s definitely a black taffeta (non-silk), with similar shades of sage green trim and ribbon.
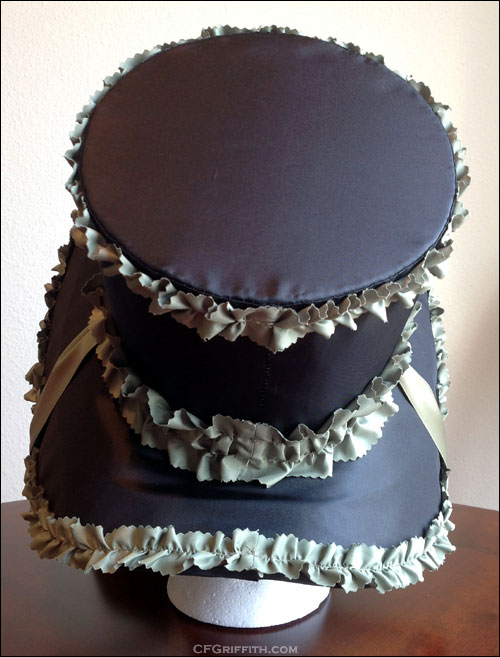
The original plan was to have white ostrich plumes going up the back seam, curling over the top. And while I loved how it looked from the front and side views, I didn’t like it from the back view, so off the plumes came.

