Costumers on Google Plus?

I’ve had a profile on Google+ for a while, but I took a while to add it on my website since they’re taking their time to make changes and test it out.  I haven’t yet seen a lot of people adding links from their blogs and webpages, probably for the same reason I haven’t.

I’m on Google+!

I already have a link for Twitter, Blogger, and once I update one other thing I’m on and join another I’ll probably have two more down the line. (I do have a Facebook profile, but I keep it mostly private and may even start using it less and thinning out my friend list — I was very pleased about Google+ starting up because I wanted something like it to use for socializing with other costumers and people I meet through my website.)

Anyway, as you can see I’ve added a link to my Google+ profile to the sidebar on the right.  Please let me know who you are as well, so I can add you to the correct circle!  I have friends all over from different interests, and my memory is also horrible — plus many of the people I know online go by nicknames totally unrelated to their real name!

Another social networking site?

When Google+ first came out, a lot of people didn’t want anything to do with it.  They hated the thought of yet another social network.  Others were happy to have something they liked better and deleted the other ones they were on or use them less.

Options are great!

I must admit, so far from what I can tell, I think Google+ has really come up with some neat ideas to make their social network stand out.  First, I like having different options.  Some of the places I’m on are for private use and I don’t mention them publicly or provide a link to them. Others, I use differently, like Twitter.

I’ve met some people on Twitter, but I mainly use it to follow news, weather, and topics I like to keep track of. With Google+, I like that it has the feel of both Facebook and Twitter, and I’ve decided to use it for my website.  I may eventually create a Facebook page like other bloggers have done, since some people prefer Facebook. We’ll see how things go — I don’t want to feel like I’m spread too thin with all of these different networking sites.

Google+ could be great for costumers

Google+ makes organizing friends into groups is so quick and easy.  If I don’t want to bother my musician friends or WordPress acquaintances with costuming stuff, I can quickly change who sees what I’m about to put as a status.

Also, while I never use Facebook chat, there is a video chat where you can add a lot of friends.  Once it’s working smoothly (it hasn’t worked the two times I’ve tried it), there is also an option to watch YouTube videos with the people you’re chatting with. Can you imagine talking with sewing and costuming friends about a certain sewing technique and someone says “oh! There’s a video for that! Hold on…” and they pull up the YouTube video so everyone can watch it at the same time and comment on it?  Also, I haven’t used it yet, but there is something called a huddle where people could chat about a topic and it keeps it all together and handy to follow.

My husband’s entry about Google+ features

My husband created a blog entry explaining some of the features from a writer’s point of view, but I think it could work for many different groups.  Instead of making one from scratch for costumers, I thought I would just link to it here (and here is another entry covering his initial thoughts about Google+).

Say hello if you’re there!

So, if you’re on Google+ I’d love to hear from you. Please let me know who you are so I can make sure I add you to the correct circle (costumer, history blogger, musician, kilt wearer, etc).  Best wishes, and I hope there can be a great costuming community that’s easy to find on Google+!

Posted in Christopher, Links, Website | Tagged , , | 5 Comments

A New Hat and Image Gallery Updates

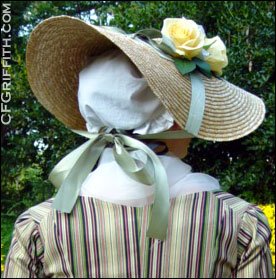
18th century bergère hatJust a quick update to let you know that I’ve added a new page to the costume gallery — my first attempt at trimming a hat.
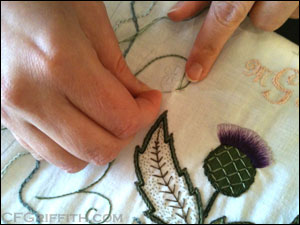
Also, in order to get some photos to post, we decided to take a trip to a small garden in the area.  It was a very hot day, even though we were there just after dawn.  We had a blast, and I have a lot of those images up in the image gallery.  There are even two photos of me using the knotting shuttle.

The knotting shuttle was the other reason we went to the garden.  I wanted to get some video of me using it and knotting thread.  It was at the end of the photo session, so I didn’t get as much footage as I’d hoped, but I’m sure I’ll be able to use it somewhere.

I still intend to make those knotting videos — my husband and I have just been very busy, and I’m new to the editing software. I’m also testing out a few other things involving the knotting and embroidery before I finish all of the videos.

I hope everyone is staying cool and having fun sewing. Best wishes!

Posted in Costumes, Embroidery, Hobbies, Photos | Tagged , , , | 8 Comments

Looking for a proverb for embroidery project

embroidering an 18th century pocketApparently I’m not only addicted to little embroidery projects, but I’m definitely addicted to accessories.  I’ve barely started working on one project (a hussif or housewife), and I’m already planning another project (I admit — I’m planning a few).

Here is where I think I’ll do something a little different, and I hope it will be fun!  I need your help for this project.

I’m working on some accessories related to sewing and embroidery.  Something I can pick up and use at home to make things easier, as well as toss into a basket and take to a costuming event.  I’ve got a lot of embroidery floss, knotted thread, and various things that are too big for a hussif.  I’ve already made a knotting bag for when I’m using my knotting shuttle, but I figure it wouldn’t hurt to have a few drawstring bags for storage.

I’ve decided to embroider and sew a work bag to hold cards of embroidery floss and knotted threads, as well as any other sewing threads, ribbons, bias tape, or whatever else I may be needing at the time.  Nothing huge, but just big enough to be handy.

I don’t think I’ll make a highly detailed embroidery design, and I’m not even sure what it will be yet.  It occurred to me, however, that a little proverb or something written in embroidery would be neat. Since items sometimes had little sayings embroidered on them, I thought it would be a nice little touch (not to mention practice).  I haven’t done that yet!

That’s where you come in!

I found a short list with some 18th century proverbs, but nothing really stood out.  Since this is a work bag, and I’m currently obsessing over putting more work into the details than I should be (embroidering something instead of just sewing it and moving on), I thought something focusing on that aspect would be neat and fitting.

  • It doesn’t have to be from the 18th century — if it is modern, but could pass as timeless, I’d be interested in considering it.
  • It can even be in French — I love that idea, even if I don’t know French (yet — it’s something my husband and I have always wanted to learn together).
  • I’m not religious, but feel free to share it with me if you have a favorite — it might help me think of something similar.
  • I’m hoping it’s not too long — I’m still not sure what design I will use, or how I’ll put the text on the project, but keeping it a little short might be wise for my first time trying this.
  • And finally, I would definitely love to keep it in a theme about how I keep decorating my sewing projects with embroidery.  Even if it doesn’t seem to be about embroidery, but hints at it (like bowerbirds decorating a nest, or something similar in nature).

It can be so hard to think of something if you don’t already see something that inspires you (especially if you have a ton of projects in mind already). I thought it would be fun to see what others think up and help inspire. It would add something special to my bag and be a reminder of the friends I’ve met online and in person.

Thanks in advance!


Posted in Embroidery, Hobbies | Tagged , | 15 Comments

My husband’s novel

Hell Comes With Wood Paneled Doors by Christopher GronlundNot only does my husband have some of his short stories for sale online, he now has a novel too.
Christopher Gronlund has made his first novel, written about 2003 or 2004, into an eBook.  You can purchase it in various formats here.

This is the same story that he read as a podcast.  He didn’t just read it — he used different voices and really got into the storytelling!

Hell Comes With Wood Paneled Doors is about:

A humorous coming of age story about a family traveling cross-country in a possessed station wagon.

So, for those of you who haven’t listened to the podcast, or enjoyed it so much that you’d like a copy to read on your own — check it out!  Enjoy!

Posted in Christopher, Links | Tagged , | 13 Comments

When to sew, and when to just buy

cadadh

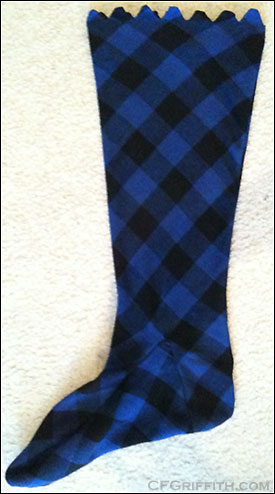
The cadadh I started -- we decided to stop working on it and just buy the type we need. The fabric most likely won't hold up, and it wasn't even the color we originally wanted.

I tried working on accessories for my husband last week.  The good news is, I have a pattern to work with for different versions later, but we’ve decided to just buy these for now.

Cadadh

I tried to make cadadh, or bag hose, for my husband’s 18th century Highland costume.  The problem is that he’s going for a fancier look, and I had my heart set on a castellated or similar top, instead of plain or fold-over cuff.

It’s difficult to be happy with something when you’re trying to make it fancier than you’d normally make.

The fabric

The biggest issue is the fabric. The colors are nice (I love blue), but we had hoped for red and black diced fabric.

The color wasn’t the only problem with the fabric. It was one of the first items we purchased when we decided to do 18th century costuming, so I can’t even remember what type of fabric it is. I only remember thinking it was probably one of the few times I would find diced fabric, so we bought it.

At the time, it had very little give even on the bias. I worried it would be uncomfortable for Christopher to wear. Once I washed it however, it was almost too flimsy.

When I cut it out following the pattern I’d made, it ended up HUGE in the calf.  I’m still not sure how that happened since I was careful. I expected a possibility of a little difference, but not that much.  It was an easy fix though, I just took it in even more. The fit was perfect. My husband loves how it feels, and said it was very comfortable.

Unfortunately, I noticed another issue with the fabric: holes and unraveling.

As I was hand sewing, I would catch glimpses of light from behind the fabric and realized the needle was leaving holes bigger than it should have been. I tried to fix the seams as best I could, but my husband goes through socks fast.  I just knew the cadadh would not last very long.

The fancy top

Instead of doing the plain cuff, we decided to try out a fancier version. That’s when we really realized the fabric wasn’t worth it. I had to keep the seams in the little triangles small, but the fabric issues were worse there.  I was already seeing ragged chunks of fabric fraying at the seams.

I would have needed to do a little more work to get the top edge to lay correctly when he was wearing the cadadh (I had to use another fabric cut on the bias to help give it a little more strength and keep it from stretching out more), but we decided to just stop at that point.  I didn’t even finish turning the points out.

The pattern

It’s not a total loss, however. My husband will also have costumes with breeches, so he’ll need regular stockings.  I feel very confident this pattern will work fine for those, or even regular cadadh if we find the right fabric.

Sometimes it’s better to just buy something for now

I also learned a lot, and got to test out some ideas. We just felt my time could be better spent elsewhere. Not to mention, since he wears a regular kilt, it’s nice to invest in accessories he can wear for both. We had asked a sporran maker who was familiar with 18th century, and he knew we weren’t going for re-enacting or 100% authenticity. He recommended a sporran type that will work for both 18th century costuming group needs, but not look out of place with modern kilt-wearing.

Posted in Christopher, Costumes, Hobbies, Sewing | 2 Comments

Knotting shuttle interest?

knotting shuttle embroidery

My first knotting shuttle embroidery project. I also hope to make some videos that explain knotting -- a lot of friends and family had no idea what I was talking about.

Wow! Imagine my surprise when I woke up Wednesday morning and my website stats had exploded!

The weirdest part? Most of the hits were new, from the UK mostly (with a few other European countries) — and they arrived at my site through various search terms about knotting shuttles.

Is there something going on centering around knotting? A museum display or lecture, perhaps? Someone on a forum getting interest rolling? Curious minds want to know! 🙂

You see, I’m new to not only knotting shuttles, but embroidery in general. I love it! It’s so fun and relaxing. Even my husband will sit with me while we watch TV and knot with me. He has even asked if he could learn to embroider a small, simple project for himself!

I’ve had a lot of people — especially non-costumers — asking me what I’m talking about, all this knotting and knotting shuttles business.  They’re not sure how or why I’m doing this. A few have even asked for videos, so they can understand better.

My husband and I decided to try to make some videos. He’s made a few non-related videos and would like more practice. Although I’m still new to it, there is so little out there about knotting — I might as well! Besides, it’ll be fun, and perhaps I’ll meet other knotters and pick up more tips and resources for study.

So keep an eye out. Hopefully the videos will go smoothly and I can share them soon.  As I said, I don’t claim to be an expert — far from it, actually — but it’s so fun and relaxing, I just want to share it with others!

And thanks for visiting!

Posted in Embroidery, Hobbies, Website | Tagged , , | 7 Comments

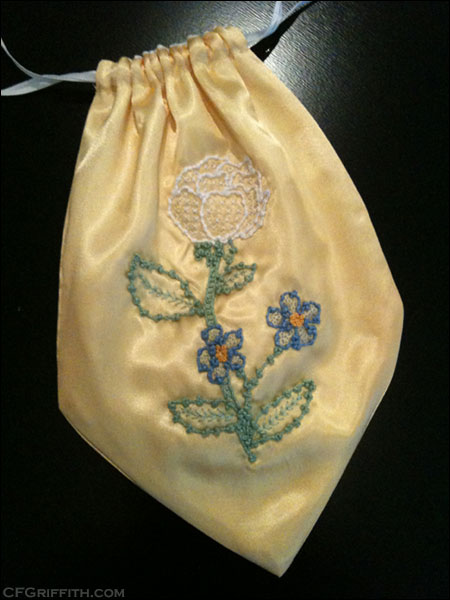
A work bag embroidered with knotted thread

embroidery couching

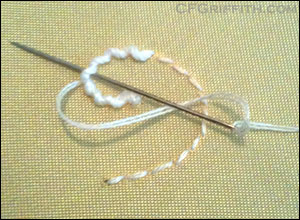
Wrapping the started ends through the back of the embroidery to tack them down.

I decided I just had to make something that I could embroider using the knotted thread I was making with the knotting shuttles I recently purchased.  It seemed fitting to make a work bag to store the thread and shuttles in.

For the knotted threads, I used crochet thread in size 3.  I wanted it to be a little thicker because the embroidery floss I had first practiced with seemed flimsy and thin.  Knotting with the crochet thread was much easier to do and definitely looked much nicer.  I’m still a little hesitant to put the knots too close together, but once I get used to how things look or work out I should be able to have fun varying the spacing.

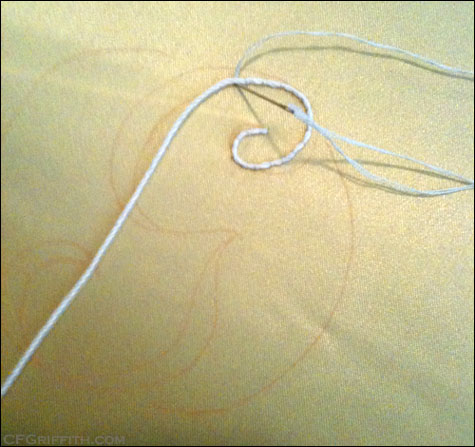
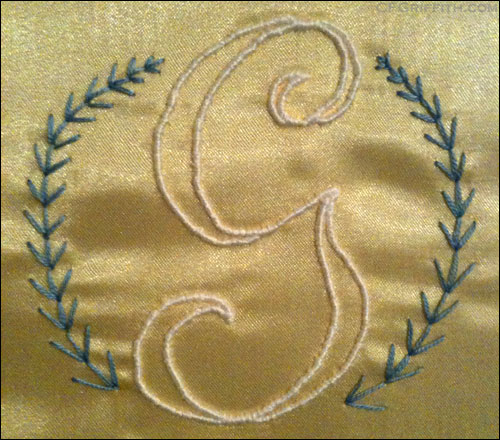
I decided to try a few different techniques.  I have never done couching before, so I practiced on one side by couching the letter “G” using crochet thread and cotton floss, and then working satin stitch around the crochet thread with embroidery floss to cover it.  I also used a quick fern stitch for the little wreath pattern around the G.

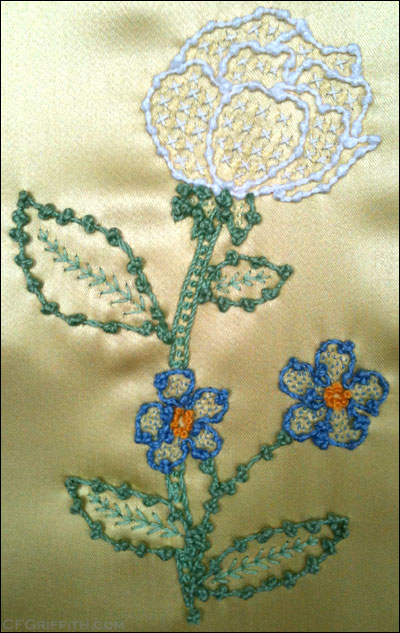
For the other side, I used both knotted crochet thread and regular crochet thread.  I tried different patterns of knots when I made the knotted thread to see how they worked together, and I also used regular embroidery stitches for filler.  I used a cross stitch, fern stitch, seed stitch, and french knots.

I had a blast with this project.  I can honestly say that I am addicted to this type of embroidery.  It’s just so much fun to mix so many textures and types of embroidery.  It makes me look forward to working with other things like ribbon!

I’m not going to go into too much detail here since I will most likely create a page for this item in my costume gallery.  I also had a few people really looking forward to seeing what it was I was doing with this knotting shuttle thing I have been going on about.  It can be hard to explain to people, so it’s just best to show them! 😉

Here are some photos:

embroidery couching

Outlining the G by couching with crochet thread. Later, I went back over it with satin stitches using embroidery floss.

knotted thread embroidery couching

My first attempt at couching knotted thread made from the knotting shuttles. I looked at the knotting section in the 18th Century Embroidery Book, by Gail Marsh for some ideas for filler stitches.

couching embroidery

The finished "G" embroidery. It was first couched with crochet thread, and then I used regular embroidery floss to cover it with satin stitches. The fern stitch part in blue is regular embroidery floss as well. I'm not as happy with this side, but it was great practice.

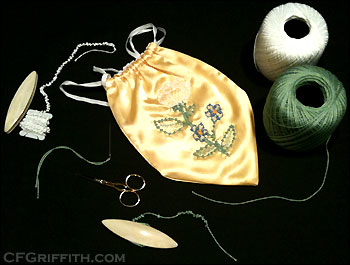
18th century work bag with embroidery and knotting shuttles

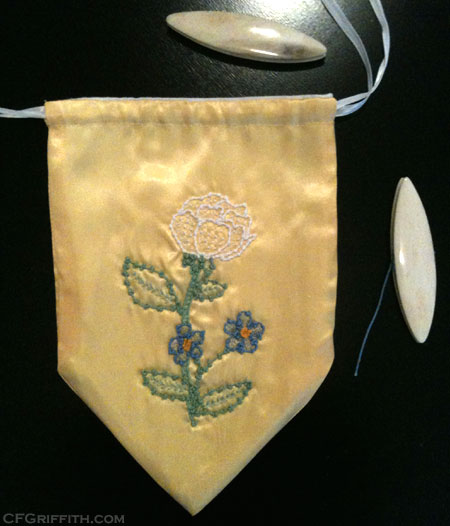
The finished work bag for storing the knotting shuttles and thread. I decided to make it a spade shape. I need to get wider ribbon, but it will be white as well.

18th century work bag with embroidery and knotting shuttles

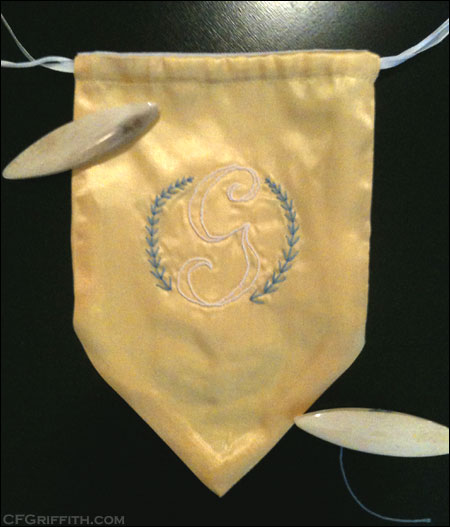
The other side of the knotting shuttle bag.


Work bag for knotting shuttles and embroidery

The bag with the drawstring ribbons closed. I think it will be handy to hang off of my left wrist while I'm working with the knotting shuttles. The knotted ends of thread will go in the bag so they're not dangling on the floor. A wider ribbon should make it just comfy and close nicely.


Posted in Embroidery, Hobbies, Sewing | Tagged , , | 3 Comments

Embroidered birthday gift for my husband

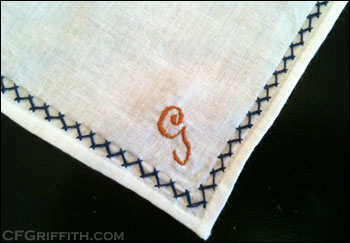
embroidered handkerchiefI’m still very new to embroidery, but I sometimes like to make things for people as gifts. This past Thursday was my husband’s birthday, and since I didn’t have any pressing deadlines I thought I would try to make him something.
It can be very hard to keep something secret from my husband, Christopher.  We’re constantly together!  He loves to see what I’m working on, and he can usually tell when I have been sewing.  So he knew I was up to something, but he didn’t know what it looked like.  The funniest part was that I’d actually chatted with him enough where he should have known what I was up to, but I managed to time the conversation when he’d had a few drinks and he probably didn’t remember it.  Whew!

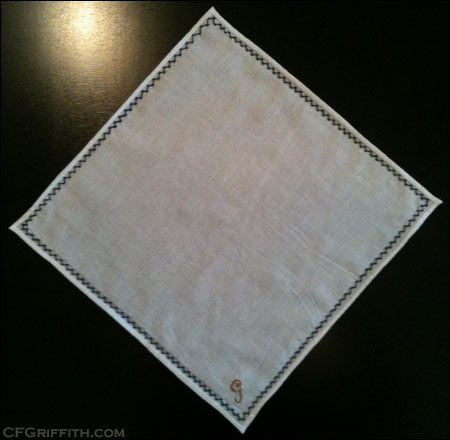
I decided to keep this project simple, so I opted for a hand sewn handkerchief.  It’s made from the cotton fabric I’ve been using for mock-ups and linings, and I used DMC cotton embroidery floss.  I had some pretty navy thread, and then I decided to get something with a copper tone for the initial.

I had been practicing various embroidery stitches, and when I was sewing the herringbone stitch in the navy thread I had, I fell in love with it and knew I had to use it on a project soon.

I didn’t quite get the corners just right, but hey — that’s what practice is for.  This was also the first time I had done satin stitch for a letter.  I felt a little rushed with it, but it works and Christopher was very pleased with it.

I hope to make him some nicer gifts for Christmas (sorry dear!  I won’t be discussing any details with you about those! Bwahahaha!), but it will definitely be hard to keep it secret.  Especially if I get started early enough and they turn out like I hope they do.

embroidered handkerchief

The embroidered handkerchief I made for my husband's birthday. I don't quite have the corners right yet for this stitch, but it was a fun project and he loved it.


Posted in Christopher, Embroidery, Gifts, Hobbies | Tagged , , , | 7 Comments

Knotting Shuttle Review

knotting shuttle

One of my new knotting shuttles from Smiling Fox Forge.

It seems so funny — I really never thought I would get into embroidery, yet I’m constantly considering even the simplest designs I can do quickly when I start working on a new project.

I’ve been purchasing embroidery supplies, and now I’ve added another.

What is knotting?

Knotting came before tatting, and is actually different.  They both use similar shuttles, but the shuttles for knotting tend to be bigger (about 4-6 inches).

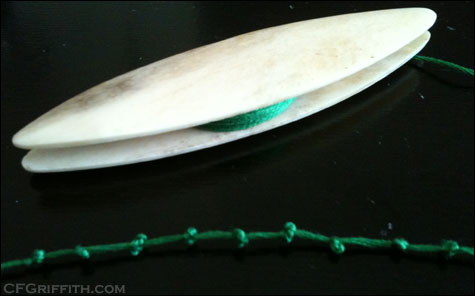
You take your thread or cord, wrap it around the shuttle, and then you knot the thread to create texture.  You then take the knotted thread and attach it — called couching — onto embroidery.  It’s great for outlining or filling in spaces.

Smiling Fox Forge

I was looking around to see who had a larger shuttle, but most seemed to be too small.  My husband, Christopher, did a search and found Smiling Fox Forge.  They list their shuttles as being about 4 inches.  I had never used them before, but I figured why not?

Their ordering process was different.  They do offer PayPal, but I don’t use that service.  They also take credit cards and money orders, but you have to wait until they contact you with the shipping added to the total.

There were a few emails that let me know my order had been placed, and this is what was going to happen next, so you’re not left out of the loop.

I had ordered Sunday, and early Monday morning I received the email for the shipping total as well as the PayPal email if I wanted to use that service. I gave them a call to let them know I wanted to use an alternate payment, and I got a very nice lady on the phone.

I’ll be honest, I was a little nervous about this system — I am usually nervous when I first try out a new company, much less a different type of ordering process — but the lady on the phone was so nice and thorough that I got over my nerves.  In fact, she sounded so nice I was disappointed that I live in entirely the wrong area for 18th century, and will never get to attend events and meet some of these suppliers in person.  Oooh, what fun that must be to be able to shop and see some of these items in person. Talk about a shopping spree!

Anyway, she told me that I would receive my shuttles in two to three days.  They were shipped on Monday, and I received them Wednesday.  Since the shuttles are so small, they were carefully wrapped in bubble wrap and shipped in one of the smaller, sturdy Priority Mail boxes.

The shuttles

I ordered two shuttles, just in case I needed a second.  A friend might want to try it with me, or I might need to change projects without unwinding and putting new thread on.  Plus, who knows if one might break or get lost.

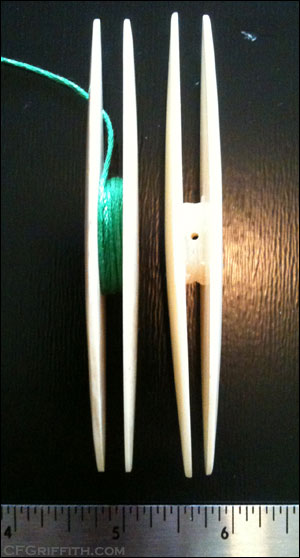
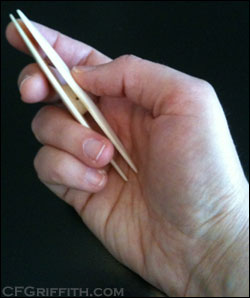
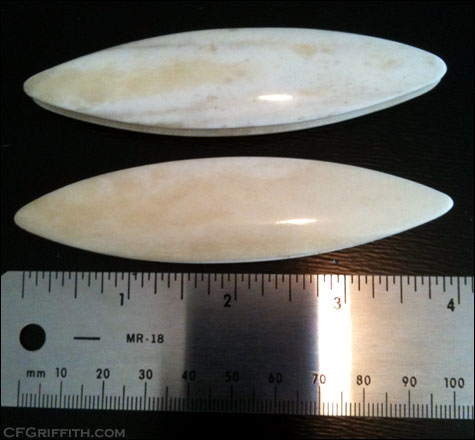
The shuttles are bone, and each one is different.  One has a few darker markings in the coloring, as well as a little bit of a notch in the edge that might catch the thread if I’m not careful.  The other is slightly longer (both are around four inches long), but one end seems a little more pinched together (see photo below).

They feel very nice in my hand, and although they’re still a little smaller than I would have liked to try, I think they’ll work nicely.

Knotting practice

I’ve already started trying to get used to knotting and figuring out a project to use knotted thread on.  I think the obvious choice would be to do an embroidered work bag.  The shuttle is held in the right hand, and a bag would be tied around the left wrist to put the knotted thread into.  It would also be nice to keep everything together when I’m not knotting.

I am practicing with some DMC cotton floss that I had sitting around.  I don’t think that is what I would normally use, so I will be getting something a little nicer.  I read on one website that crochet thread was recommended.  I’ll look around and see what stands out.  I’ve actually never tried couching before, so I’m not sure what will be best on the embroidery itself.  More research!

Something to do at events

Women in the 18th century would work on knotting often.  It showed off the wrists and hands in an attractive way.  It was almost used as an accessory, like a fan.

I also considered it because there will be times at events where I would love to work on something, but it might be too dark for me to work on embroidery or hand sewing.  Knotting might be just the thing for me, and there is less to haul around.  Plus, as I mentioned, it is an accessory and accessories really add to the costume 😀

Another good purchase for me!

I’m glad I decided to buy another embroidery tool.  I’m sure I’ll still need some practice, which seems funny when you consider it’s just knotting thread, but I want to make sure my spacing is nice and even.

I would also order again from Smiling Fox Forge.  I’m very pleased with the service and my shuttles.

Knotting shuttles

It might be hard to see the color differences in these bone knotting shuttles. They're right around 4 inches long.

knotting shuttles

You might be able to just make out the slight difference on the bottom end of the shuttle on the right. I haven't used this shuttle yet, but I doubt it will be too much trouble. I had wanted to use the largest shuttle I could find, but these do feel very nice in my hand so far.

knotting shuttle

Practicing with cotton embroidery floss. I will probably try to find something a little nicer to use for knotting and couching onto embroidery. It's fun to practice and think of what to use it on, though!

Posted in Embroidery, Hobbies, Reviews | Tagged , , | 7 Comments

Clear packing tape dress form

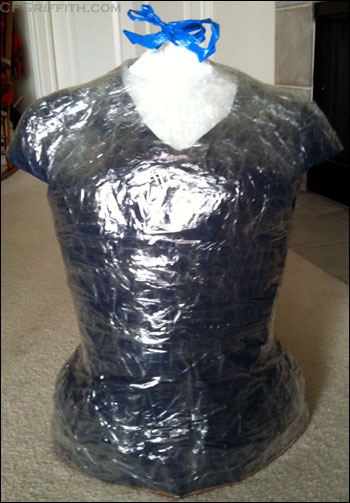
clear packing tape dress form

My clear packing tape dress form -- Jen Thompson wanted to try this type of dress form material, and wrapped the tape for me.

I held off posting about this until I had a chance to use it for the first time.

I mentioned recently that a friend of mine, Jen Thompson, wanted to try a different type of tape to make a dress form.  Since I only have a store-bought dress form that is not even a match for my natural form, much less my measurements while wearing stays (and I definitely can’t put my stays on it) I was more than happy to be her test subject.

Clear packing tape

I’ve never made a tape dummy before, but I know there are a few variants out there.  I’ve heard of paper tape, and duct tape, but Jen wanted to try clear packing tape.

Since she is an art teacher, she’s familiar with that type of tape used for sculptures.  She thought it would work well for a dress form.

Making the dress form

I won’t go into details of making the dress form — mainly because I was the one getting taped at the time, but also because that’s Jen’s blog entry if she would like to do it.

There are tutorials on the Internet about how to wrap the tape to get the best fit.

Finishing the dress form

One thing I did realize, once the tape form was cut off of me — it went flimsy rather quickly.

When I started finishing the dress form with packing peanuts, my husband Christopher and I realized we needed to try to add a few more layers of tape.  The waist was collapsing on itself, so he held the upper part up to help spread the dress form back to its upright position.

I simply added a few strips of tape in that area (some straight, some on an angle making an “x”), and it helped strengthen and straighten the form back to its proper shape.

Any other place that felt a little thin, we added a little extra tape.

Once the cardboard bottom went on, the dress form felt like it would be sturdy enough.

Sizing difference

Jen had warned me there was the possibility that the dress form might be a little larger than my actual measurements.

Once the dress form was finished, I measured it and noticed that it did seem to be off about half an inch to an inch.  I wasn’t sure if the measurements we’d taken while I was wearing stays might have been off (sometimes my husband laces the stays tighter than other times), but I kept that in mind when I started working on the K Gown jacket.

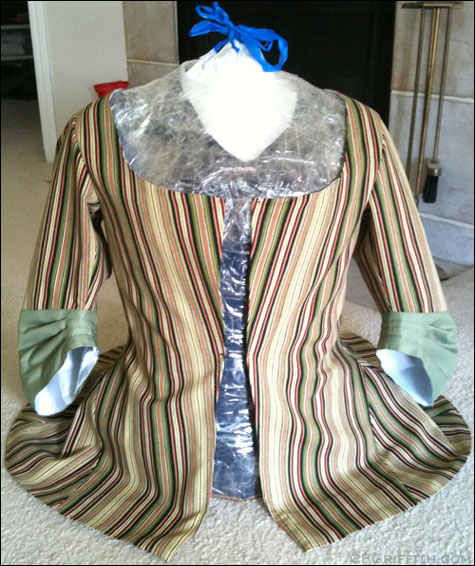
The back and around the arms and shoulders of the dress form seem to work perfectly when I am working on making and fitting a pattern and garment.  When I went to try on the jacket, I saw that the dress form is slightly bigger than me.  Fortunately, I was making a front-edge closure so it was very simple to fix.

If I wanted, I could probably remove the bottom base of the dress form, carefully cut the dressform and re-tape it with a little of the excess “taken in” for a better fit.  I probably won’t do that right now.

One of the other things I didn’t think about, was how far down I needed to go on the hips.  Some of the outfits I will be making need to go over pocket hoops.  This doesn’t seem like a problem at first, except that without my hips or legs helping push out the pocket hoops, they simply won’t stay out.  It’s not a big problem — I just put the garment on my other dress form (the outfits definitely won’t close or fit perfectly on it), and see how much extra room the skirts of jackets have or need.  Then I do a final check on me while wearing the pocket hoops.  My store-bought dress form also does not hold out things like pocket hoops and bustles very well, either, but it is a little longer than the tape dress form so that helps.

Final fittings will always be on me

I’m not too concerned with having my dress form be absolutely perfect right now.  I’m aware of the slight difference in size on the front side, and I will always do final fittings on myself to make sure things fit before they’re fully finished.

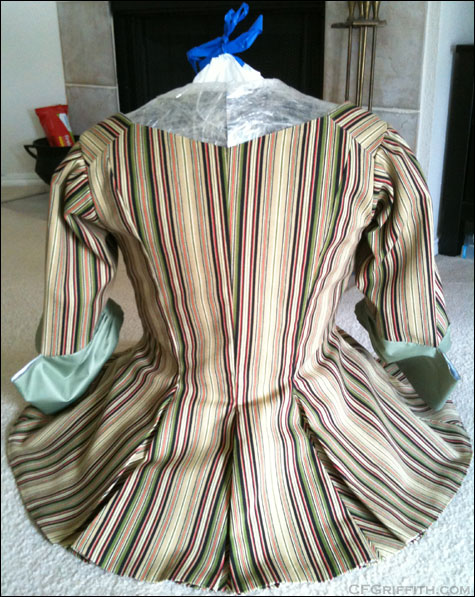
For now, I’m just happy to be able to get those back, shoulder, and arm seams fitted perfectly.  The dress form does its job helping me get fittings along far enough where I can do most of the work without any help.  Since I need help getting into my stays for a final fitting, my husband has also learned over the years to help with pinning or basting to get any final touches I might need.

Thoughts

Unless I gain or lose too much weight, I see this dress form helping me for a long time.  Even if I do need to make another, it’s a simple list of supplies (tape, t-shirt, cardboard, and packing material), wearing my stays, and having someone who knows how to wrap the tape properly and smoothly.

I will see how long the dress form holds up over time. I do have a tendency to stick pins into the form to hold things up or closed.  This makes the pins a bit sticky, and understandably causes holes to be poked into the tape.  I’m hoping it won’t affect the structure, and as long as it’s not too full of pin holes, I should just be able to slap a layer of tape over the top to help smooth it out again.

Thanks again, Jen!  I wouldn’t have been able to make my K Gown jacket without my new dress form!

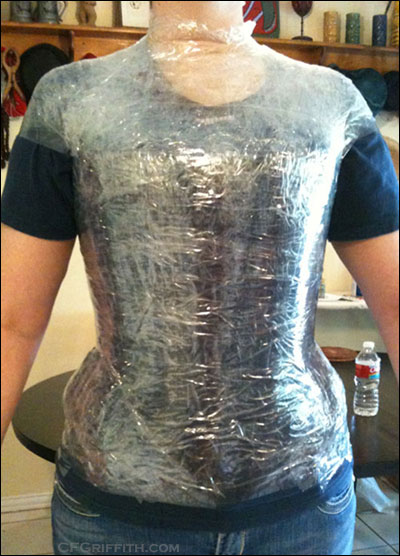
clear packing tape dress form

The clear packing tape dress form before it was cut off. I am wearing my 18th century stays to get the proper shape.

clear packing tape dress form for 18th century costuming

My 18th century jacket on the dress form -- you can see that the dress form is slightly bigger than I am, but I still got a great fit using it.

clear packing tape dress form for 18th century costuming

The dress form is very helpful for fitting 18th century garments -- especially on the back seams, and around the shoulders and arms. I will just need to make sure there is enough room for pocket hoops.

Posted in Friends, Hobbies, Reviews, Sewing | Tagged , , , | Comments Off on Clear packing tape dress form