My 18th century shoes and stockings

I thought I would do an entry about my shoes and stockings since I have been getting so many compliments about them!

It took a while to decide

I wasn’t sure at first, before I had really looked around the online shops, what I would use for my stockings.  I thought I might just have to use some regular long socks, or attempt to make my own.

As far as the shoes, I have known since I started planning to sew 18th century garments which ones I would get.

I still get pretty nervous ordering online.  I like to see and feel a product to get a better idea of what I am needing.  When it’s something that is sized, I am definitely nervous.  It can be hard finding the right fit even when I am trying something on!

The stockings

I went with the cotton clocked stockings from Jas. Townsend.  Actually, I asked for them for Christmas and was happy to receive them as a gift from my mother-in-law.

I wasn’t sure how they would fit, but they work well.  I have muscular calves that are just big enough to annoy me when I’m shopping for tall boots.  The stockings are a little tight around my calves and only go up to just-under-knee for me (I’m just under 6 feet tall).  They stay up and look good, though, so I’m very pleased.

I’ve already washed them and there was no shrinkage or anything like that, so I hope they last me for a while.

They’re very comfortable, and add a nice pop of contrast under my petticoat with my black shoes.  For the price, I’m happy, and would definitely order another pair.

The shoes

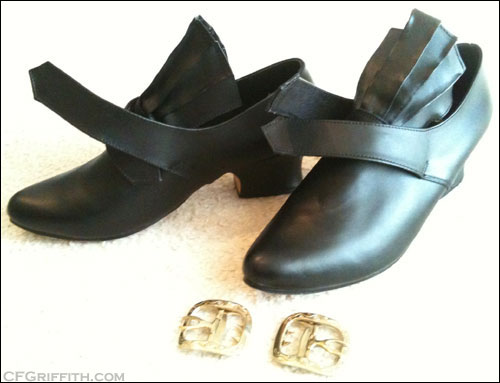
The shoes I bought are from Fugawee, and they are the Martha style in smooth black.

I wanted to stick to dark leather, since I will be wandering around outside and am nervous about damaging anything cloth or light-colored.  At the same time, I wanted something that would look fancy, and with the height and shape of the heel, the Martha shoes continued to be my favorite as I kept checking the website out over time.

I contacted them to ask about the sizing, and they replied quickly, explaining to just use the modern shoe sizing I normally would.  They told me the C width was the widest.

I tried on some of my own modern shoes (my size can vary, depending on the shoe type or even brand), and decided which size I would order.  I also ordered the Vine and Leaf buckles in white bronze.

Once we ordered Wednesday night, the auto-reply came through quickly, stating the order was received.  I’m not sure which day the package was shipped (I forgot to check the shipping label), but I received it quickly on the following Wednesday. It actually took me by surprise, and I was thrilled to have them that soon.

The shoes were still in their box and then placed in the shipping box.  The buckles, in a plastic bag, were carefully placed with the shoes.

Also included were instructions about returns in case the shoes did not fit.  There were also instructions for putting on the buckles, as well as velcro (also included), in case you wanted to wear the shoes with a tie or ribbon instead.  I ended up using Jas. Townsend’s video showing how to put buckles on shoes since I had already seen that before I’d ordered and was familiar with it.

My feet were a little cramped in the toe area, but that’s normal.  The rest of the shoe fit well, although I have to work my foot in the shoe carefully past the heel.  I had a silly moment, and when I thought I saw the tongue getting caught in the shoe with my foot, I pulled on it — gently, I thought — and I accidentally ripped part of the tongue from the base where it is connected.  No problem, the latchets cover it and I will be careful with it.

I wore the shoes for a couple of days to help stretch them out.  By the time of the event, they felt just fine.  I still have a slight toe squeeze issue, but it’s not as bad as when I first put them on (again, this is just me… sizing shoes can be very frustrating for me).  I need to be careful walking, because the soles are still new and slick.

I did have a bit of the black dye bleed onto my white stockings inside.  This is pretty typical for leather shoes in my experience, so I expected it and didn’t mind.  The stockings cleaned up enough with a wash, and I don’t think anything will show.

Happy Customer

They look great, and I have been getting a lot of compliments on them!  Paired with the stockings, I’m very pleased!

We hope to order one of the men’s Colonial Fugawee shoes, and Thistle buckles when the time comes.  I’m sure he’ll be pleased with his purchase when we do.
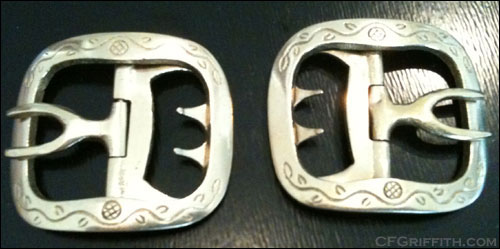
Vine and Leaf buckles from Fugawee

Vine and Leaf buckles from Fugawee.

Martha shoes from Fugawee

Martha shoes from Fugawee, before I added the Vine and Leaf buckles.
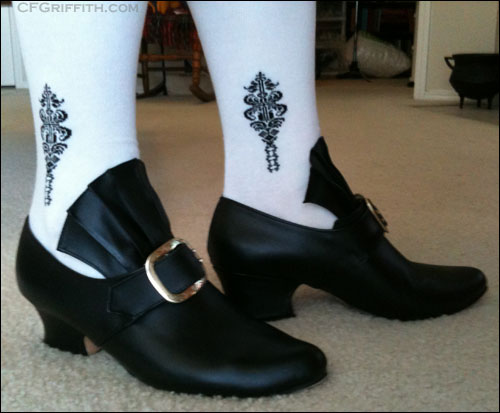
 

18th century shoes from Fugawee

18th century shoes from Fugawee, with clocked cotton stockings from Jas. Townsend.

Posted in Costumes, Hobbies, Reviews | Tagged , , | 4 Comments

The K Gown

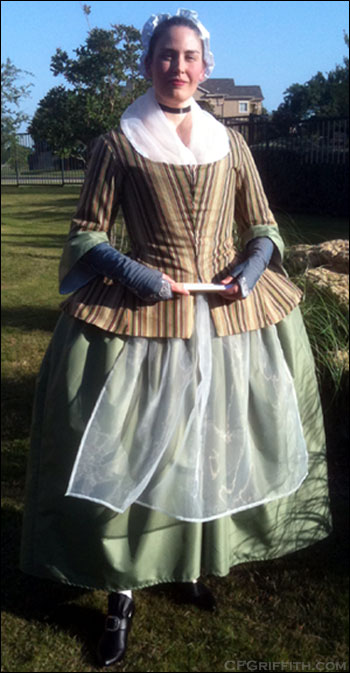
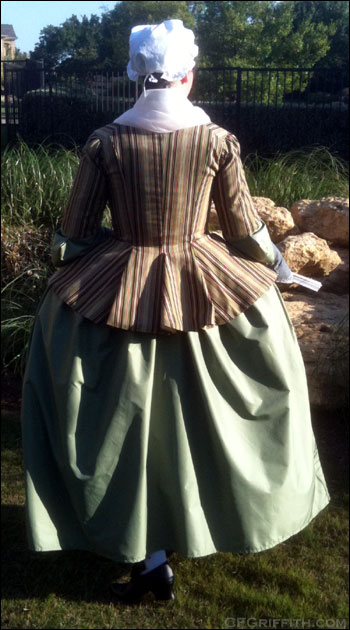
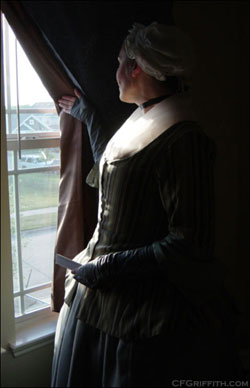
If you saw the photos from the last entry, you’ve probably already seen my first finished 18th century costume.  The photos are at the bottom of this entry.

Why the “K Gown?”

I named it the K Gown after Kaycee since she had given me some of the fabrics I used (striped under petticoat, green petticoat, and the striped jacket fabric).  I actually had not planned on making this style jacket until I saw the fabric and was inspired.  It also works great with the green petticoat fabric.

It was a huge help, and I don’t think I would have finished in time without her help.  I still have plenty of fabric left for other garments as well!

The Jacket

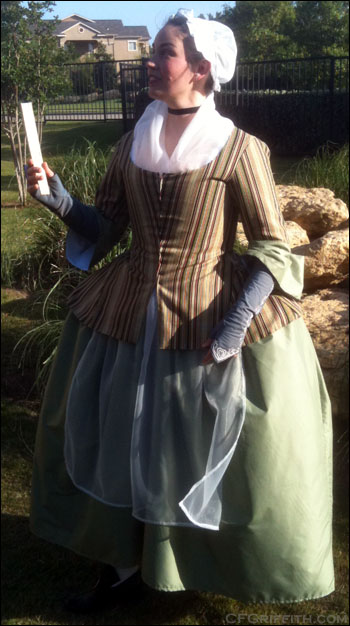
The jacket is the main part of this outfit.  I intend to use the green petticoat for another jacket down the line.  This will help me have a few outfits a little quicker than starting from scratch each time.

I used the jacket in the Janet Arnold book Patterns of Fashion 1: 1660-1860 (page 26 , view C).  I decided to put the stripes on the sleeves running up and down since it seemed like the original jacket in the drawing had them that way.

I still need to work out some kinks with the pattern I made.

What bothers me

I thought I had fixed the top opening part of the front, but it’s still pulling apart too much and showing the hooks and eyes closing the front edges.

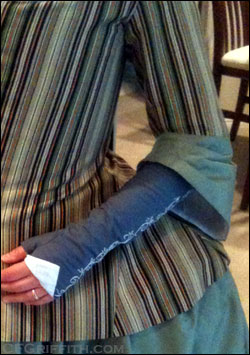
The cuffs hang a little too low, but it was difficult to know what I would be more comfortable with.  I’m sure as I make more jackets with sleeves like this, I can vary the length to get them to hang just right.  I don’t see myself bothering to fix that part right now as I don’t personally feel it would be worth my time.

I think I also need to consider adding a little more room to the sleeve head as it might be pulling the shoulder straps off my shoulders a little too much.  The shift was showing on the side edges, but I also think part of that was an issue with the shift itself.  What’s interesting, is that the jacket’s shoulder area sits better on me when I’m wearing a different shirt that isn’t shaped like the shift.  Perhaps the shift is pulling the sleeves off the shoulder more than they should be?

I made a last minute decision to tie the shift’s drawstrings a little too tight, and I think it may have thrown things off in the neckline more than I expected.

Also, I had not tried on the jacket with the shift before, and found out it’s an annoying process trying to put on the jacket and keep the neckerchief staying flat on my shoulders/neckline.  The shift has elbow-length, fuller sleeves, so they cause a bit of bunching up in the armhole and sleeve area.  I thought I had pulled and smoothed things enough, but that might have also added to the neckline issues somehow.

It definitely made for a neckerchief that wasn’t lying how I wanted it to be.  It was sticking up too much and was a little too puffy for my tastes.

Finally, it was hot.  I know most of that is because I’m not wearing the best kinds of fabrics for layers like this, but it surprised me that my legs were the hottest.  My mid-section wasn’t too bad, even with my fully boned stays that have thick cable ties and canvas layers!

Next time, I hope to press the back skirt of the jacket better.  I originally had it pressed, but thought it might look nicer without sharp pressing and ironed it smoother.  With all of the getting in and out of the car, the jacket’s skirt was wrinkled and didn’t fold correctly.

I’m still pleased

It sounds like I’m picking the outfit apart a lot, but it’s a good thing to see what can be improved for future outfits, or even making them easier to put on and wear.

Still, for my first outing, it wasn’t too bad for a long car ride and wearing everything for just over six hours!

Page added to costume gallery

I’ve added a page for the K Gown to the costume gallery.

18th century costume

My first 18th century costume.

18th century costume

18th century costume

This outfit will work fine for a while. I just need to get used to wearing it and make adjustments while I'm putting it on.


Posted in Costumes, Hobbies, Sewing | Tagged , , | 11 Comments

Wine and whist evening

18th century costume

Wearing my first 18th century costume to an event.

I finally have my first 18th century costume, and had my first chance to wear it out this past Saturday.

La Bonne Compagnie

A few of us are part of a private costuming group called La Bonne Compagnie that focuses on 18th century.  While we are not re-enactors, we hope to learn about 18th century and have fun sewing and wearing the clothing we make.  We are hoping to get in character a bit as well, to make it even more special.

It’s nice to be able to really celebrate all that hard work we’ve done sewing our outfits!

The event

The party Saturday, hosted by the lovely Kaycee, was a small gathering with wine, champagne, snacks, and learning to play whist.

Kaycee and her husband went out of their way to set up a fun little space to inspire a nice 18th century atmosphere.  It was an excellent evening, and we hope to keep having great gatherings like that and get the group active.

There were several members who couldn’t make it this time, and they were greatly missed.

I didn’t finish a costume for my husband, but he dressed up in his kilt and had fun chatting with us.  He’s looking forward to having a few costumes as well.

New photo gallery

I set up a photo gallery for posting photos from some of our events.  I think it would be easier than trying to put them all on one blog entry.  Especially for those events with a lot of photos.

I didn’t get as many photos as I should have, but Kaycee (who is a wonderful photographer), took some photos.  Some of them are posted in her blog entry.

My event photos are located here.

The costume

I’ll hopefully have an entry and costume page up soon about the finished outfit and how it was to wear it.

I look forward to finishing many more gowns and definitely look forward to many more gatherings and events to wear them to!

Posted in Costumes, Events, Hobbies, Sewing | Tagged , , , , | 5 Comments

Gray 18th century embroidered mitts

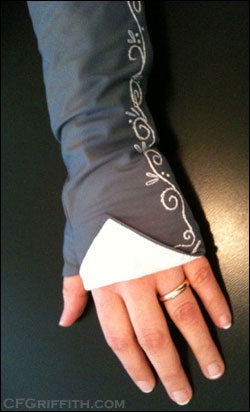
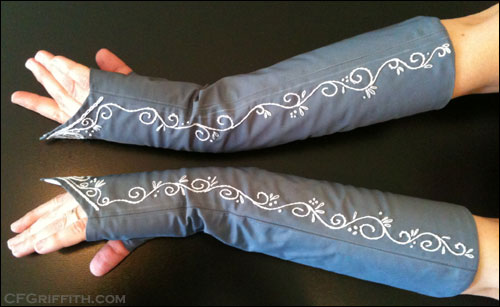
18th century embroidered mittMy first pair of 18th century mitts are finally finished!
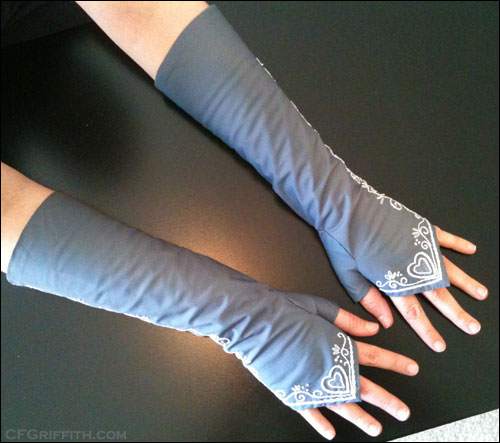
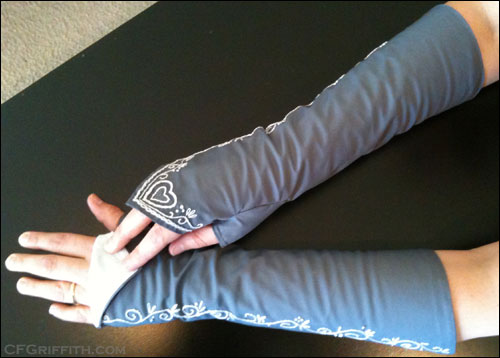
For some reason, the thumbs were giving me fits.  It didn’t help that I was also feeling like I was “all thumbs,” especially on the second mitt.  I was literally dropping things left and right.  I would drop my needle and have to re-thread it.  Then I would drop the mitt and have to re-thread the needle again.  Needless to say, I couldn’t wait to take the photos for my website (I didn’t even bother to try wiping off the guide markings) and toss them in a drawer.

They’re very pretty — I love the color, especially, but I’m just ready to move on.

In fact, I’m ready to just have fun and not sew for a change.

I’ve had to sew so many layers just to even get to an outfit and accessories, I think it’s time to just wear an outfit and have fun with my friends!  In fact, this Saturday will be my first event with my friends.  I look forward to having a completed outfit and relaxing.

I still have to finish embroidering and sewing the second pocket, and my husband will not be in costume, but it will be fun regardless of finishing the pocket or not.

Some quick info on the mitts:  I used the pattern from this page, the fabrics are taffeta (most likely not silk) and cotton for the lining.  I used DMC cotton embroidery floss.  Check out the costume gallery mitts page for more information.

18th century embroidered mitts

18th century embroidered mitts

18th century embroidered mitts

Posted in Costumes, Embroidery, Hobbies, Sewing | Tagged , , , | 12 Comments

Sewing deadline approaching

I’m still scrambling to meet my sewing deadline.
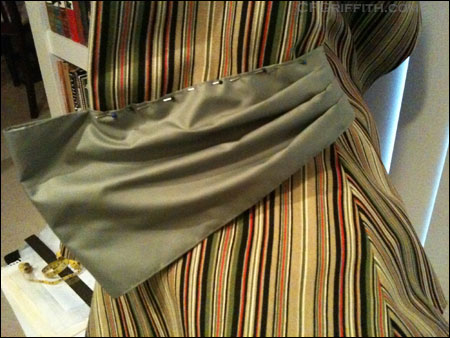
Our private 18th century costuming group is having a little gathering on May 7th — costumes not required — and I’m hoping to throw together an outfit as fast as I can.  My poor husband will have to wait, so he’ll probably just dress nicely and wear his kilt to make it special.

My outfit won’t be perfect or fancy, but at least I’m trying to move quickly and get over worrying about perfection.  Right now, the most important thing is to have a couple finished outfits.  Then I can worry about being more authentic and fancy.

I’m almost finished with the first outfit.

The first couple of outfits will all share the same green petticoat.  Most of the tops will be “undress” jackets.  Basically (if I understand correctly), these are jackets that one usually wears at home, but not really out.  You can receive guests while wearing them, but you’d dress nicer if you went visiting.

Now you can see one of the (many) reasons I was second-guessing myself recently.  I almost felt like I should have tried to make something a little fancier.  It definitely makes me want to do that for my second jacket.

Unfortunately, I may have to wait a few days before officially finishing.

I’ll be adding the cuffs to the jacket a little later today.  Unfortunately, I don’t have any hooks and eyes (I can’t bring myself to use pins to close garments — no amount of reassuring from anyone works. Iit just makes me nervous worrying if they’ll truly stay closed or if I or someone else will get stabbed or one falls out and someone steps on it).

I need to make a trip to the fabric store to pick some up.  This also means an official-official, final fitting won’t happen for a couple days, so I won’t even know if I’ll have to do some last minute scrambling to fix any errors to make it fit properly.

What’s next?

After I attach the jacket cuffs, I’ll need to get to work finishing two other projects: the second mitt, and the second pocket.  That means embroidering and sewing.

I’m a little nervous I won’t make it.

While neither of those projects are that important, it would be nice to have an extra pocket, and the mitts might help spruce up the undress jacket.  I might decide at the last minute the mitts won’t really go with the outfit, but it’s just nice to have the option.

Plus, it’s also nice to mark two more things off my list completely.

Why’s it taking so long?

This is my first bodice for 18th century.  I’ve not had to fit something like this before, and I want to make sure I get close enough at least.  Also, the stays are back-lacing and I need help putting them on.  It’s not as quick as my Victorian corset (which I can put on by myself).  Sometimes I have to wait before I’m able to double-check my work and make sure before I continue.

This is the first time I’ve used my new tape dress form (which I hope to talk about after I complete this outfit).  I needed to make sure it truly was close enough that I could trust it, before I went too quickly.

I’ll admit, too, that there were days where all I wanted to do was cuddle with my sweetie and take it easy.  Sometimes, I just didn’t feel confident and was worried I’d mess up the jacket.  Other times, I needed to do a little more research to make sure I understood what it was I was about to do.

Thank goodness for deadlines, though.

Although I’ve missed several costuming events over the years for various reasons (many of them I wouldn’t have been able to attend for reasons outside of my control), it’s still nice to have real deadlines to aim for.

I look forward to having most of my foundation garments finished (there will always be more I need to make), as well as a few different outfits for various needs for 18th century costume gatherings.  I also look forward to not having to worry so much about deadlines, and being able to really focus on the details!

Do deadlines help you, or just stress you out more than you needed?

18th century jacket cuff

About to attach the first of the cuffs on the 18th century jacket.

Posted in Costumes, Hobbies, Sewing | Tagged , , | 4 Comments

Sewing can be repetitive and frustrating at times

Sometimes sewing is a quick, gratifying experience for me.  Other times, I feel like I am doing the same thing over and over again.
I’m not talking about the act of sewing in general, but rather perfecting a project.

Sometimes I feel like I’m spinning my wheels.

There are times I find myself thinking “aren’t I finished yet?” before I even start working on the actual piece.

Of course, a lot of that is my own fault — I’m not working from a purchased pattern.  I’m working from a drawing in a book, and trying to size it or make changes to it.  It doesn’t help that I’m still learning as I go along.

For example, on my current project, I’m trying to make a jacket to wear in time for an 18th century party in a couple of weeks.

I made the initial pattern from the drawing, and then used some scrap fabric to test it out on my dress form.  I made the changes I needed to make and then made a better mock-up that I tried on myself.  It fit better, but there are still a few final things I need to adjust.

I just feel like I wasted even scrap fabric (an old sheet, so it got some use before it was tossed out) and the “fabric” I use to make my patterns.  The sort of changes I had to make would have made a mess of piecing it together, so I started from scratch on some of the pattern pieces.

It doesn’t help when you’re still not feeling great about the project itself.

I keep second-guessing myself on this project.  It wasn’t going to be my first jacket, and the style is different than what I’m used to seeing.

I’m still unfamiliar with 18th century clothing and how it’s supposed to feel to start with, so add garments that are even a little different than I expect (and working from drawings only, no less)… well, it can seem a little bit like wandering around in the dark.

I also have some other projects I want to finish in time as well, so I really need to get finished with this jacket!

I’m still happy with any small victories.

Even still, I’m very pleased with the sleeves so far.  I did have to make a second pattern piece for the sleeve, because it wasn’t as full as I thought it was at first, but the mock-up sleeve turned out very nice.  I’m hopeful the final version will be just as good.

Also, as I mentioned I’m still learning, so I’ve been happy with my ability to see an issue somewhere on the garment, and be able to adjust it to fit better.

Now to make the final pattern and start working on the actual jacket.  I just hope it turns out nice enough.  I’m sure once I’m dressed up and having fun with my friends, I won’t worry about it, but I’ll probably see photos later and pick out all the details I don’t like.

I just keep reminding myself it’s more important to get some things finished and worry about the bigger details later.

I still can’t help sometimes but look at my “To Do” list, how much is left on it, and then stare at the current project/s and feel like I’ve walked into a very tall building with only a stairway winding up and up and up.  You think of all that repetitive work just to get to the top, only to walk back down and do it all over again.

Then again, there are all those pretty-pretties to be made and worn, so obviously it must be worth it.

How about the rest of you?  Do you go through the same frustration with things, especially when it comes to perfection and fitting?  How do you keep your spirits up?  Especially when you need to hurry up and finish something, but don’t want to end up hating it later.

Happy Sewing!

Posted in Costumes, Hobbies, Sewing | Tagged , , | 8 Comments

Current projects for 18th century costuming

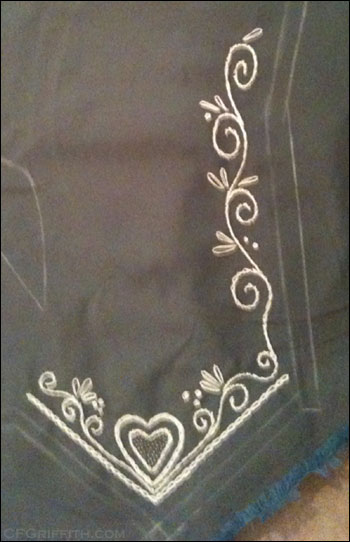
Embroidering 18th century mitt

Doing the seed stitch filler on my first 18th century mitt. I'm still new to embroidery.

I’m trying to finish a few things for an upcoming private gathering with the 18th century costuming group.  One of them is an actual costume piece, and the other is to help with my sewing.

18th century mitts

I have been working on the pattern for 18th century mitts.  I made a mockup to check the sizing, using an old pillowcase.  It seemed to work fine, but I’m a little worried that — even cut on the bias — the final version will not fit as well.

I’m using some sort of taffeta that’s most likely not silk.  The fabric store didn’t seem to have a good selection when I was there.  I will also be using a cotton for lining.  I want the lining to add a nice contrasting effect when the flaps are turned back, and also to hide the embroidery’s back side.

Instead of just sewing up a pair really fast, I decided I just had to embroider them.

The prep work went fairly slowly, and the first part of the embroidery was also slow (something with the fabric, I suspect).  It’s starting to go much quicker now.  I still have to finish up the embroidery on the first mitt, sew it, and then prep the next mitt for embroidery and sewing.

I am noticing something I don’t like with this fabric.  On my pockets, the stem stitch on the scrolling vines was smooth.  No matter what I do to make all of the stitches smooth on this taffeta, they still have a choppiness to them.  Oh well — it will get the point across, and it’s yet another learning experience.

I do hope that they fit and everything works out nicely.  I shared the pattern with a friend, Jen Thompson, and I can’t wait to see how it works for her.  She’s much better with working out patterns and making things so awesome.  I figured it was the least I could do since she’s always been such a huge help for me.

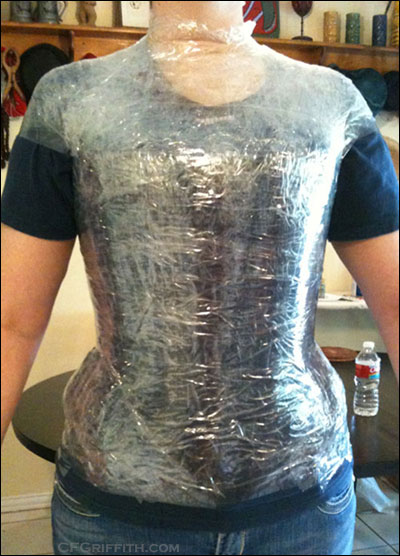
Tape dress form

Which leads me to my next project.  A clear packing tape dress form.  I need something so I can make and fit my 18th century jackets.  Jen wanted to try this type out and see how it works compared to others.

I’ve not finished it yet.  I’ve sealed up the back, but I still need to fill it, and clean up and seal the opening edges.

If it works out nicely, I think I’d like to make one for my husband.  I think tape dress forms would be a great help getting me started on the right path, and of course doing major or final fittings on the person.  My husband isn’t always around when I’m sewing, and I’m not in the mood to have to put the stays on (I need help to put them on) every time I need to try something on.

I just wanted to update with some of the things I’m working on at the moment.  I’ll of course do full entries on each project when I finish them.

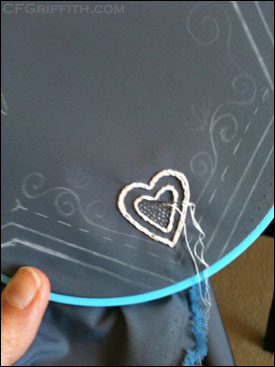
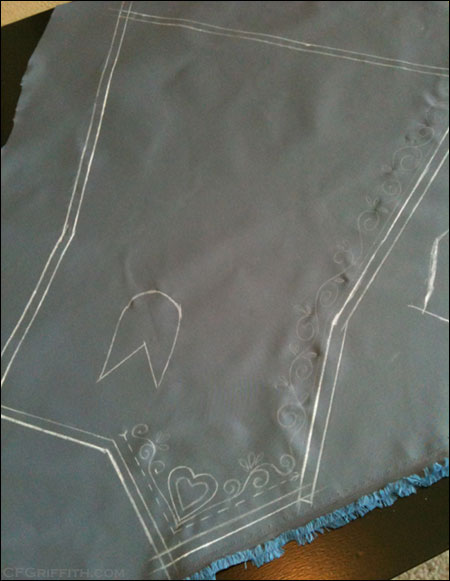
Marking out the 18th century mitt

The 18th century mitt marked out for embroidery and cutting. This will be my first pair.

Progress on the 18th century mitt

The embroidery is about half finished. The fabric caused the stitching to be a bit choppy -- nothing I did seem to fix it. I still like it, and hope the mitts fit well.

Pre-cut tape dressform

The tape dressform (over my 18th century stays), just before cutting it off. I still have a lot of work to do to finish it before I can use it.

Posted in Costumes, Embroidery, Hobbies, Sewing | Tagged , , , | 6 Comments

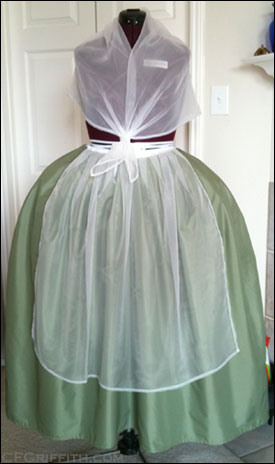
Quick 18th century apron and neckerchief

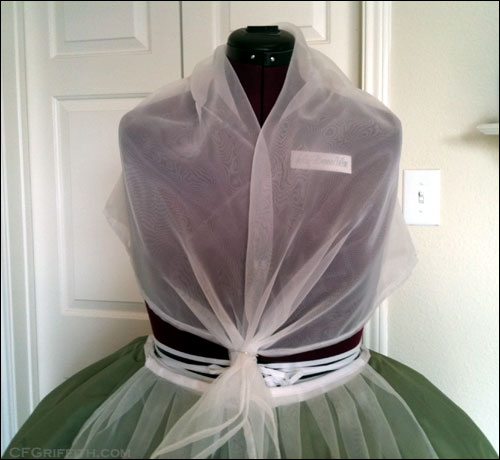
18th century apron and neckerchief

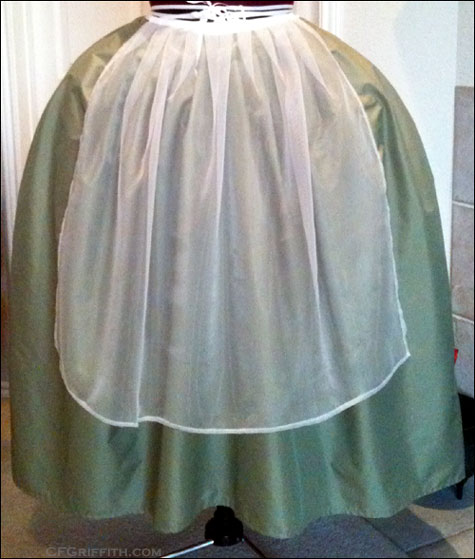
My first (and quick) 18th century apron and neckerchief. I needed something that looked nicer than a "working" apron, but didn't find quite the right fabric I wanted. The fabric was also hard to work with.

I have a possible private costuming event coming up in late April or early May, and I wanted to get as much finished as I could.

One of the things I had on my To Do list was an apron and neckerchief.  Even though my character will not be doing work, many times fancier aprons and accessories were worn.  Unfortunately, the sort of fabric I was looking for wasn’t available, so I had to get the next best thing.

The Fabric

I had hoped to find a very light, gauzy linen or even silk, but all of the linens in the store I had to shop at were very thick and heavy. My husband and I had both looked at some paintings so he could see what I was wanting to make, and after looking at fabrics, we both agreed this was my only option for now.

This fabric is still nice, but it was very difficult to work with.  It was hard to see, and it was very slippery.  It made sewing a thin hem very difficult.

Construction

I didn’t use any patterns — I merely guessed the size and shape that would work.

All of the hems were hand sewn, but I decided to use the sewing machine to sew the bias tape onto the apron.

One thing I do wish I had done on the apron was to cut the waistline in such a way where the middle of the bottom edge didn’t hang quite so low compared to the sides.

Worries

I think the apron will work okay, but I’m a little concerned about the neckerchief.  They’re worn as fillers for the neckline of bodices for daytime and outdoor wear.

I’m wondering if the fabric will be a bit scratchy for my neck, and I hope it doesn’t shift around or back out of the neckline too much.

Fortunately, if it does become a problem, I do have a sheer scarf that could work until I get something better.

For next time

Next time, I would love to get some really gauzy, light fabrics like linen.  I would love to have more time to embroider the apron and possibly the neckerchief (depending how I wear the neckerchief, especially — some have the ends hanging out, pinned down or tucked under tabs on the front of the bodice or stomacher).  I would also try to get the shape of the bottom hem of the apron a little better for my tastes.

For now, it will work for my needs.

18th century neckerchief

Pinned to the dressform for now. This will be worn under a bodice or jacket, and tucked in, with the ends crossing over slightly. I'm hoping the fabric doesn't shift around or back out too much.

18th century apron

The quick apron. I wish I could have found a light, gauzy linen or even silk, but this should work for now. It was difficult to work with this fabric, so I couldn't sew the thin hems I wanted. I also didn't have time to try any embroidery on it.

The costume gallery has also been updated to include a page for these garments.

Posted in Costumes, Hobbies, Sewing | Tagged , , | 7 Comments

A quick update: Blogger, Downton Abbey, Sewing, etc.

I just wanted to do a quick update — I’m hoping to have a better update or two this week, sometime.
Sewing

I’ve been staying very busy.  I’m trying to keep sewing, although I’ve not been as productive as the petticoat week.  I’m trying to make a few accessories before I work on a tape dummy and sew a jacket or two.

I’m also looking forward to finishing my garments (for the first one or two outfits, anyway) so I can start working on my husband’s again!  I’m excited about costuming with my friends and letting my husband join in.

He seems excited as well — I caught him looking briefly at a few informative websites about period card games to see what they’re like.

Downton Abbey and Christopher

I had about two days where I wasn’t feeling too great, so I watched Downton Abbey on Netflix.  I know, I’m a little slow finally getting around to watching it.  I’m not a big fan of being glued to television’s schedule, so I waited to catch it on my own time.

I loved it SO much, I told Christopher about it and we sat down to watch it together over a period of a few days.  By the second episode, he exclaimed “We are buying this on DVD!!!” I kept warning him about the last episode, and sure enough as the end credits started rolling, he practically jumped up and had fits.  He wanted to see more!

I think he’s hooked! 😉  (what a lucky gal I am to have a husband who loves watching things like that with me)

Blogger

I decided to create a blogger account so I could more easily reply to friends there.  I also felt like I was missing out on the great sewing and costuming community there.  I feel a little alone on my self-hosted server (although, I very much appreciate those of you who reply here or talk to me about my entries in person or elsewhere — thank you so much!).  Having an account there will help people recognize me, or even get a feel for who I am when they see me replying.

I don’t know if I’ll do anything more than just use it as an informative placeholder for this blog/website.  We’ll see how my needs change over time.  It seems like a neat setup so far.

I’m looking forward to keeping up a little better with my friends, as well as meeting new people.  Here is the link to my blogger account.

Hoping to post later this week

I’m hoping to post two entries later this week — one related to sewing, and the other to something Christopher did this weekend.  In the meantime, I hope everyone has a wonderful week!

Posted in Blogs, Christopher, Hobbies, Links, Sewing | Tagged , , , , | 3 Comments

Week-long 18th century petticoat sewing spree

After the tea event, I decided I had enough fabric — not to mention the drive — to get cranking and start sewing like a madwoman.

I decided to start working on the 18th century petticoats.  I used Koshka’s instructions, and they were very clear and easy.  The petticoats went together quickly, and were fun to make.

First 18th century petticoat.

My first 18th century petticoat

The first petticoat

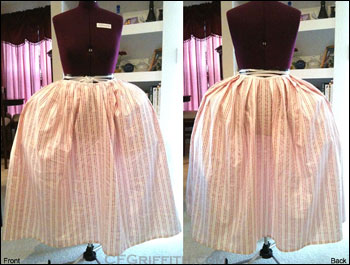
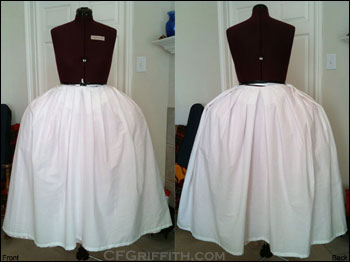
I started with the red and white striped petticoat, which will be the first petticoat worn over the pocket hoops to help add fullness to the outer gown.

This was one of the fabrics my friend gave me.  I took a little more time on it, and I finished the seam allowances by hand.  I considered top-stitching the bottom hem by hand, but decided to just use the sewing machine.  I also used the sewing machine to sew the side seams together, along with attaching the store-bought bias binding (although I did the second side of binding by hand).

I didn’t pay enough attention when I was hemming, and it turned out longer than I’d intended.  I’m going to shorten it, which will be easy and quick.  I also wasn’t fully pleased with the pleats, and hoped my next petticoat would come out better.

Second 18th century petticoat

My quick second 18th century petticoat.

My second petticoat

The second petticoat, which I’ll wear over the red and white striped one, was made from the rest of my never-ending bolt of white cotton fabric.  I’ve made several of our garments (shift, shirt, cap, etc) from this fabric.  I decided to use the cotton to finish it up as well as have a different petticoat to add to the layers.

I am trying to speed things up instead of focusing on more authentic construction techniques.  Our private group would really like to start doing events, and I would just be happy to have a couple outfits finished before I focus too much on details.

I decided to pull the serger out and skip hand finishing seams.  It was also used to finish the edges after I cut, just in case the edges unraveled and drove me crazy.  I used sewing machine on the side seams and hem, as well as attaching the first side of the binding.  Hand sewing was used to finish the binding.

The length turned out fine (although I may shorten it slightly), but I’m still not completely happy with the pleats, especially on the back side.  I was determined not to have the same problem with the final petticoat.

18th century petticoat

The third, and outer, 18th century petticoat. I'll use this with a couple different tops for variety.

The third petticoat

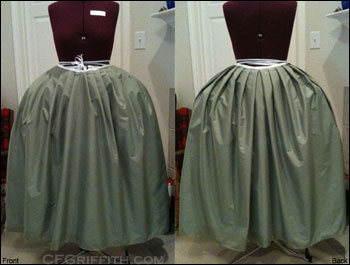
This was made from another fabric from my friend. I’m very pleased with how this petticoat turned out.

I considered putting more time into it and doing some hand finishes, but decided again to focus more on finishing it quicker.

I used serger on all edges after cutting it out, since I wasn’t sure how the fabric would unravel on the edges.  I used sewing machine on the side seams, bottom hem, and attaching the first side of binding.  The second side of binding was finished by hand.

I took more time with the pleats, and this time I’m very happy with them.  I did have a little trouble with the length for some reason, but I’m hoping the differences aren’t too obvious.  I’m just going to shorten the red and white striped petticoat and keep an eye on them.  In some ways, I’m glad this petticoat turned out as short as it did.  This will be an outdoors outfit, and I don’t want the hem touching the ground or getting stepped on.

Trying them on, and concerns

We hurriedly put on my shift and stays so we could get photos and see how the petticoats fit.  I should have made sure everything was even, but I was more interested in seeing how much the under petticoats needed to be shortened.  It was interesting, wearing it all together.  I’m looking forward to seeing how a full outfit will be to wear.  I need to get used to walking around and wearing pocket hoops, not to mention trusting my sewing more.  I’m the same way with my bustle — I’m nervous it will fall apart, so I treat them as if they were fragile.

The under petticoats are definitely too long with the green petticoat length error, but that will be a simple fix.  The one thing I don’t like — and it may be the way I pleated the middle sections — but the front and back, right in the middle of the petticoat, tends to curve in.  I may just have to find a way to smooth things out.  It’s difficult to know what needs to be where since I didn’t have a mirror handy, and in fact I ended up tugging too much here and there and pulling sections a bit out of place for the photographs.

I’m a little concerned with all the ties that are piled up around my waist.  The hanging pockets are tied on.  The pocket hoops are tied on.  Each petticoat has two sets of ties (front and back).  A side of me is half considering using hooks for the petticoats, but I’ll see how things go over time.  If the bottom petticoat or two slide too much, that’s a big possibility to help fix them, aside from hemming them shorter.  I still need to replace the temporary ribbons with better twill tape.

Hoping to keep sewing

I’m very pleased with my progress so far.  I’m hoping to keep sewing and continue finishing my costumes and accessories — both for myself, and my husband.  We also have some things we’ll need to purchase, like shoes.

Knowing that I have a fun group of friends waiting for me to finish, so we can have fun really helps keep me going!

Be sure to check out the costume gallery which has been updated with the 18th century petticoat page (it has a lot more photos of the petticoats on there), and new photos added to the pocket hoop page.

Posted in Costumes, Hobbies, Sewing | Tagged , , | 11 Comments