Looks like I’m getting into embroidery

I don't want to post photos of my practice embroidery yet, but since I had to post a photo, I thought I'd at least take one of my old hoop.

I know I mentioned in my last entry that I didn’t plan on doing any embroidery for a long time, but it looks like I have no choice in the matter.  I’m already getting hooked.

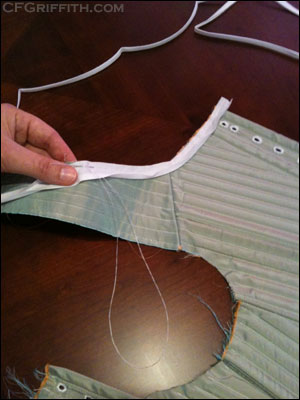
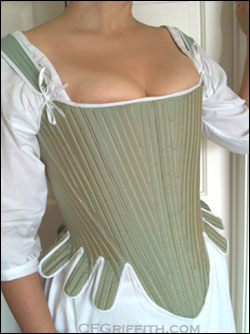
I ordered the hoop boning for my pocket hoops (see bottom image), which should be here mid-week hopefully, but I realized I really don’t want to put things in the pocket hoops.  The thought of items rattling around in the pocket hoops would drive me crazy, so I decided to go ahead and make some hanging pockets (see 2nd image).  I’d had an embroidery design in mind for my first hanging pockets — not necessarily 18th century accurate, but no one else will see them, so I don’t mind.  I’ve been looking at the embroidery book, as well as spending a lot of time at an excellent website for embroidery to learn the basics.

I’ve been practicing here and there, trying to figure out the stitches I want to use and learn them as best I can.  I have embroidery floss and hoops that are possibly as old as I am.  Not only are the hoops too small for what I need, but the bigger one is a little rusty (they’re metal) and slips a little.  I knew that I would have to buy some more hoops if I wanted to proceed, so I went to the Joann Fabrics website.  I didn’t realize they had a sale going on for that very department, and I came across this lap frame.  I loved the look of it, and the price was right (I even had a 10% off coupon for online purchases — I have only ordered online one other time).  I just couldn’t pass it up!  So now, I’m anxiously awaiting the arrival of my frame.  I can’t wait!

It’s just so amusing that I had no intention to get into this at the moment since I’m so far behind on my sewing schedule for various reasons.  I’m having so much fun with it.  Although I don’t see myself doing all types of embroidery, I can definitely see how this hobby will fit into my life and be an enjoyable way to pass time if I need a project to keep me busy here and there.  The cutest part (and I hope he doesn’t mind my mentioning it here), my husband Christopher saw me looking at the embroidery website and he checked it out.  A few nights later, he asked me if he could borrow a small hoop and a bit of fabric and give a stitch a try.  Heheh!  He won’t be taking up embroidery (he’s too busy for that), but he just wanted to see what it was like and if he could do it.

I have the pattern for the hanging pockets ready to go, but I still need to finalize the embroidery design for transfer.  I worked out a few details last night for the pocket hoops, and will hopefully be working on the pattern today.  Maybe even cutting out the fabric if I have enough time.  I have to wait for the hoop boning to come in, as well as make a trip to the store for some more supplies for both sewing and embroidery.

I also wanted to apologize for being behind on some emails.  This past weekend, my husband’s computer freaked out and he spent the whole weekend trying to fix it.  It should be working now, although it’s been taking some time getting things back the way they were.  His podcast is running late, but he uses his computer for work so that was the biggest worry.

I’ll try to get caught up with replies when my nerves fully settle down, and once I get caught up on my sewing goals for today or tomorrow.

Sorry I didn’t post a better photo — I didn’t want to leave this entry plain, and I didn’t find anything else to use.  I don’t want to share any of the practice scraps yet.  I’ll post photos here and there when I start embroidering the pockets, and any other project I work on down the line.

Posted in Costumes, Embroidery, Hobbies, Sewing | Tagged , , | 2 Comments

My husband’s surprise birthday gift to me

This past Sunday, Halloween, was my birthday.  It was a great day, despite a few folks feeling under the weather.  I received many thoughtful gifts and wonderful donations of cash to help keep me sewing!  I thought one gift, in particular, would make a great blog entry.

My husband knows me very well.  Sometimes, I think he knows me better than I do!  He definitely listens to me.  He must make mental notes about every little muttering on things I’d like to do or learn, because this birthday he bought me the perfect gift.

He was searching online for just the right gift.  He found a card seller he knew I would love, Cartolina.  Actually, he got me two cards, because he couldn’t decide which one I’d like more.  He also gave me a third card since we sometimes like to buy cards to have handy for giving away.  One had little birds on it, and the other is an 18th century lady holding a “Happy Happy Birthday” banner.  The extra card has gossiping Victorian ladies on it.  He also bought me The Exile by Diana Gabaldon (a graphic novel based off her Outlander series).

He was torn about what else to get me.  He wanted something really special.  Something I hadn’t mentioned so it would be a surprise, but covered a subject I was currently involved with or wanting to do soon.  He came across 18th Century Embroidery Techniques by Gail Marsh.  He crossed his fingers and bought it.  Little did he know!

I was so shocked when I unwrapped the gift, I’m sure my jaw hit the floor.  I remembered seeing it mentioned somewhere online before, but I had not even thought to add it to any of my lists of books to purchase or look into.  Although I have a lot of garments to make, and will probably have to leave special things like embroidery for later, it’s definitely something I want to try when I have a chance.  I know I’ve mentioned a few times in passing that I would love to attempt a few spots of embroidery to learn enough to do larger embroidery, or commented how lovely certain embroidery decorations are on garments when I have shown him photos.

I must admit, the thought that went into the gift, the care it showed in choosing it, and how much he obviously pays attention to what I’m babbling about or mentioning… I actually cried a bit.  It meant so much to me, and I look forward to someday giving embroidery a try when I have the time.  I know I now have an amazing book for inspiration and help when the time comes.

Thank you so much, Christopher.  I’m so very lucky to have you in my life!  Thank you for listening to my sewing babbling, and being so supportive.

Posted in Christopher, Gifts | Tagged , , | 10 Comments

My first 18th century stays are finished!

My first 18th century staysIt unfortunately took me a while to finish my stays due to various reasons (travel and conferences, researching and decision-making, and mental health breaks), but I’m very pleased with how they turned out!  As usual, I’m hoping they last for a while — part of the learning process for me is seeing how my sewing holds up to wear and tear over time — but I think they’ll work for a little while at least.

Made my own “pattern”

I decided I didn’t want to buy a pattern since I would still have to deal with size and fitting.  I also have the book Corsets and Crinolines by Norah Waugh, and I have never had a chance to make clothing from the historical pattern books I have.  There was a design for stays (page 39, Fully-boned stays/1730-1740) that I really liked the look of.  Of course, I couldn’t leave it alone and decided to make the front part plain, instead of the stomacher that’s part of the original design.

I really didn’t know what I was doing, so I took some “graph” fabric (Tru-Grid graph material) and estimated the size of length and transferred (rounding up here and there — I figured it would be better to have too much to work with, than too little).  I should have been better at figuring out the sizes, but when I ended up working on it, I was still not sure I was actually starting the process at that time.  It was one of those “let me see… if I do this…” moments that kept going.  Plus, it was late at night and I just couldn’t get it off my mind.  It just sort of happened in an unplanned way.

Mockups and changes

The original mockup was off here and there, but it gave me a feel for how to proceed and what I needed to do.  I made the changes, and version two turned out much closer.  There was a little more tweaking and changing, but most of the panels at that point were what I ended up with.

I decided that I would make the stays as tight as possible to allow for weight-loss.  With all the time I was putting into them, I didn’t want to have to make another one any time soon.  I usually make a fabric mockup just to test things, and I need to stop doing that (more on that later).  I didn’t have any boning in my mockup, so while I had a feeling most of the fit would be fine, there was one area I couldn’t really test that worried me a little.

Worries

It was amusing, actually, that I wasn’t too concerned about the fit of the stays.  Even if they were tight, they would be strong enough to pull where needed.  No, my biggest worry was about the tabs.  The design I picked has long tabs, and they overlap on the sides over the hips.  Mine seemed to be overlapping too much, and I couldn’t imagine how they were supposed to spread out and not be in each others’ way.   I’m honestly not even sure if there is a way to test these types of tabs without making the stays out of the actual materials.  I had a few people reassuring me, and I decided to just dive in and see how they would turn out.

My next worry was the waistline.  The design I was going for seemed to be very long-waisted, and I had actually made another pattern to make my stays longer.  I decided not to use it because I didn’t like the way it looked on me, and I just didn’t feel as confident about that version.  My current stays may not be long enough in the waist, but the fit is nice and it works for me at the moment.

The materials

I decided to use long cable ties (varying lengths) for the boning, and make them fully-boned.  My husband helped me pick out some outer fabric.  He was a huge help since I was torn between two or three fabrics.  We chose a silk taffeta made out of golden-orange thread, and a turquoise-blue thread.  The resulting color differs depending on how it’s angled, and the lighting.  Sometimes it shimmers a golden color with a light sage green, and other times I’ve seen it pick up the blue.  It was a subtle color change, which we both loved.  The inner fabric is a bottom weight canvas we chose because it was thin enough, but had almost no give when we were tugging on it in the store.  I used two layers of the canvas, putting the boning in between those, and flat lining the silk to the top canvas layer.  I decided to skip the lining, because I wanted to cut a step out and didn’t think it would be an issue.  I also wanted access to the seams on the inside, just in case there were any problems.

Blood, sweat, and tears

Unfortunately, what turned out to be a good base fabric choice for strength, was a terrible choice for hand-sewing.  Pain!  That fabric was so hard to do certain types of stitches on.  I’m still a little lazy with thread, so I didn’t use any special types of threads, nor did I prep them.  I had to use fresh thread sooner than I normally would, because the fabric was shredding the thread with certain stitches.  It also caused lots of stabbing and jabbing, even with a thimble.  The inside of my stays are a little sloppy, but that’s okay — no one is going to see it.

Finishing touches

The eyelets are all hand-sewn.  I wish I had been more confident with those, because I ended up doing an extra step I didn’t need.  I’m used to finishing eyelets with a buttonhole stitch.  I had created a practice piece, using the layers of fabrics from scraps, but I had such a terrible time at first, getting them to look nice that I was paranoid about doing them without the buttonhole stitch.  The first eyelet I did on the stays, would have been just fine without, but since I added the stitch, I had to make them all that way.  In all honesty, they would have looked better without!  Oh well.  Next time I know better, and to trust my skills enough to just go for it.  I’m also amazed the eyelets are so strong!

The bias tape is store-bought, because I wanted to save myself some time and trouble, not to mention some money.  I desperately need to buy a rotary cutter, and a cutting mat.  This is only the second time I’ve edged something like this (my Victorian corset was the first), so I figured another practice run with store-bought would be fine.  Honestly, it’s such a thin line, I didn’t think it would make much of a difference.  Thankfully, it went on a lot smoother than I thought it would, although stitching the binding around the inner corners of the tabs was definitely annoying.

What I learned for next time

There are some things I will probably deal with again next time (I still have plenty of the canvas left, so I’m sure there will be more stabbed fingers and shredded thread again in the future), but hopefully I’ve learned my lesson on some of the others:

  • Use the cardboard fitting technique.  I didn’t even know about this until I was already past the fitting part.
  • Be a little more accurate with transferring lines and creating the pattern.
  • Finish the edges to diminish fraying and so I don’t have to mess with it later.
  • Find another cutting method for the zip ties.  The tool I used had trouble cutting acute, long angles.  Filing dulled down the points, so I’m not too worried about that, but it could be an issue in some spots.
  • Maybe do more research next time to see if changing thread or preparing thread would be worthwhile.
  • Definitely don’t be afraid — move on and have a little confidence!
  • Feel confident enough with the eyelets to skip the buttonhole stitch finish.

It took a while, but I’m happy

It definitely took me far too long to finish the stays.  I was unfamiliar with the fit and feel of them (I’ve only worn hourglass-shaping corsets), but knew how vital it was to get the proper period shape and support.  Fortunately, it worked out and I’m very pleased with my first stays.  Hopefully the next stays I make will go a lot smoother, but I think having made a few corset-like garments and carefully researching the subject as well as looking at a lot of art and photos helped me figure out what I needed to do.

Don’t be nervous to give something like this a try.  You might decide to buy a pattern to save a little trouble with sizing and fitting, but there is a lot of helpful information on the Internet that explains the construction.  There are also designs for half-boned stays, which are still very sturdy.
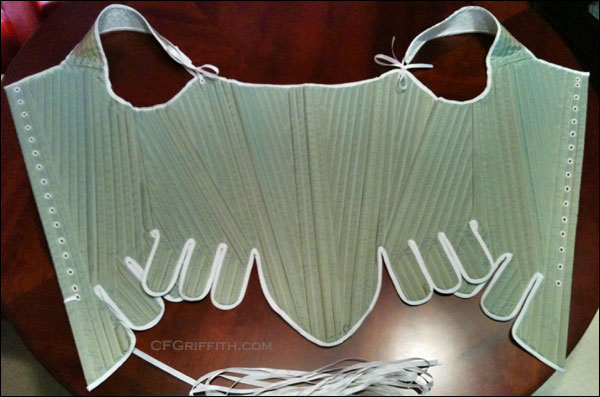
My first attempt making 18th century stays

The tabs over the hips overlap when they're like this, but spread out when I'm wearing them.
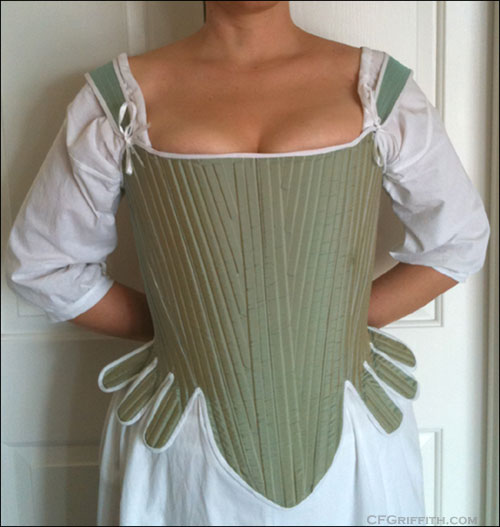
The small dark spot on the right side of the photo (my left) is a sweat stain. I hold the stays there with my arms while my husband helps lace the stays. We're getting the hang of it, but I admit I like Victorian corsets better with the front busk.
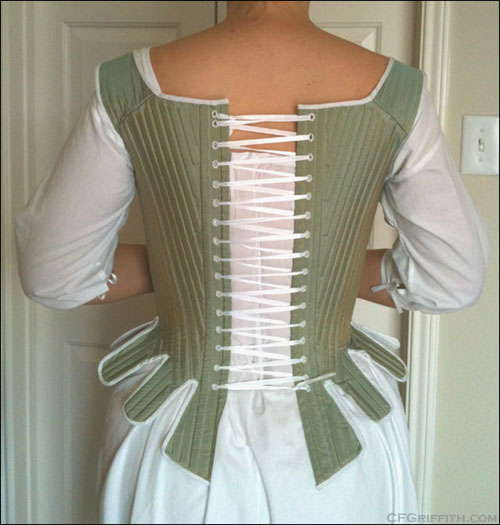
My husband is getting the hang of lacing the stays and helping me keep the shift from bunching up. The bit of white on the bottom right corner is the loose end of the ribbon where it's tied (knotted right now) to the stays. I need to tuck it or trim it.
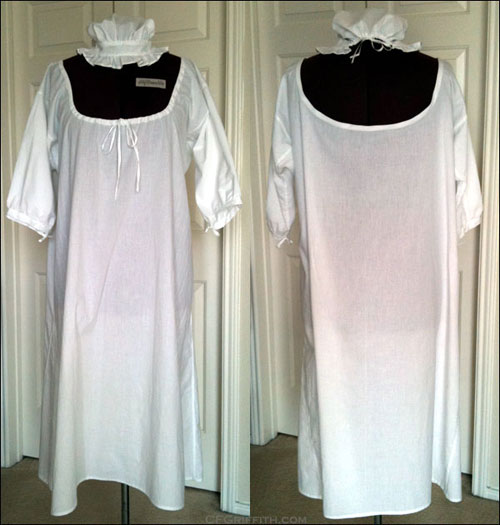
Finally finished my first 18th century shift (the neckline was last). I made the neckline as low as possible -- better to have it too loose, than showing in the neckline of the garments. My first cap is on top of the dressform.
Posted in Costumes, Hobbies, Sewing | Tagged , | 13 Comments

My husband’s first podcast is online!

I talk a lot about my husband, Christopher Gronlund, on this blog.  He means so much to me, obviously!

I’ll be mentioning him a little more.  He just started getting into podcasts.  He has a few others planned — especially for his The Juggling Writer website — but for now, I’m going to talk about his very first podcast:  he’s reading his first novel, Hell Comes With Wood Paneled Doors, a chapter a week!  You can check out the details on the podcast website.  Here is a little about the story:

Hell Comes With Wood Paneled Doors is a humorous coming-of-age story about a family traveling cross country in a possessed station wagon…

When Michael O’Brien’s father, James, buys a new car just in time for the family vacation, he signs away more than his old ’74 Gremlin as a trade in.

If you’re in the mood to hear a goofy, fun novel from a writer who really enjoys making quirky, touching stories, please give it a try!  I’m not just biased, either!  I actually had read Christopher’s writing before we ever met, and I was already a fan.

Posted in Links, Voicework | Tagged , , , , | 3 Comments

Working on the website, and wondering about Akismet

Christopher and I have been sick for just over a week, so I took the time to do some work on my site instead of sewing. I’ve made a lot of behind-the-scenes changes, and I’m now starting to add a few of the things I’ve been needing to add (the galleries will be a little while, still).

One thing I did add was Akismet (an anti-spam plug-in).  Unfortunately, I’m not actually seeing the spam it’s catching — for all I know, it could be marking real comments as spam.  It’s not putting it in a queue where I can go look, and correct any mistakes.

So if you reply here and notice it doesn’t post, use the link on the Contact Me page to let me know.  Please remember, if you have never replied here before, or use a different email address, comments are moderated the first time you reply.  After that, as long as you use the same information, you should be able to reply without going into the moderate queue.

Posted in Website | Tagged | 5 Comments

It All Adds Up

It occurred to me recently, when I was looking at supplies I needed to buy for sewing, just how quickly the money adds up with a hobby like this. The problem with sewing is that many people don’t realize what goes into it if they don’t sew.
Not always just thread and fabric

There are times when simple garments really do require nothing more than fabric and thread — and sometimes fairly inexpensive ones, at that.  Many times, however, there are many more supplies and parts involved.  Take corsets, for example:  you have different layers of fabrics, stiffening hardware like boning and busks, grommets, and lacing.  Some corsets are heavily boned, which means they require a lot more boning, and they usually use different kinds of boning made for specific areas of the corset.  Some grommets are better than others.  What about cutting your own boning and having a good grommet-setter?  Those tools cost money, even if they are a one-time purchase. Sometimes you have to order many of these things since they’re not always available around the corner at your local fabric or craft store.

Quality costs

The other thing about sewing is if you want something to look great, you need to invest in better materials.  As I mentioned above, this doesn’t just mean fabric itself — the hardware and notions also make a difference.

Some people want costumes that look just like a costume used in a movie.  Again, the person sewing the garment has to look for fabrics that are an exact match or as close as they can get.  You usually have to pay a pretty hefty price to get some of those really nice fabrics, too.  In fact, most fabrics that are really nice and rich-looking usually cost a lot more.

Other reasons higher-priced costumes and garments look nice is not scrimping on layers or fabrics.  If a costume requires fullness in the skirt, not only are there possibly hoops supporting it, but there are usually a couple of petticoats or layers of fabrics used to help the skirt look correct.  Billowing folds and trailing, draping rich fabrics look that way because enough yardage was purchased to achieve the look.  Add any extra trims or ornamentation, and there is even more time and money involved.

Time is money

Artisans definitely earn their money for the time and skill they put into garments.  There are of course varying levels of detail, from basic to incredibly detailed, but they still had to work on it.  There are many times I’ve been amazed to see just how much has gone into some of the costumes I’ve seen made by friends.

Some even sew by hand and rarely use a sewing machine.  This not only adds authenticity to some garments (such as re-enacting), but it also adds to time spent.  Some hand-embroider, or hand-bead.  The options for customizing a garment to purchase can be amazing, but it can also take a lot of time.

Why I’ll never sew for money

I am incredibly impressed with those who make a living doing this, or even just extra money on the side with a few commissions.   Honestly, I don’t ever see myself doing anything like it.  I don’t work quickly enough (I’m still learning), and I don’t want the added stress.  Plus, I have enough ideas and plans to keep me busy for a very long time.  I just don’t see myself being able to squeeze in even more sewing to do.

Respect and patience

Those who sew or create items like sewing, leather-working, etc. deserve respect and they deserve patience.  They’re not running to a store and buying a garment instantly — they’re creating something completely from scratch for someone.

Check out their FAQs and communicate with them about what you need, but try to understand what you’re asking for.  If you’re wanting something that looks great and is very complicated, it’s going to cost a lot.  (It’s not uncommon for many of the top costume-makers to charge into the $1,000’s for a custom costume.)

People don’t wear things like that every day for a reason.  Not only are clothes like bustle gowns with trains and tons of draped overskirts a bit much for our usual day-to-day activities, there is a lot of yardage and time and supplies put into a garment that is a one-of-a-kind creation.

Posted in Sewing | Tagged | 4 Comments

18th Century Stays — Getting Closer

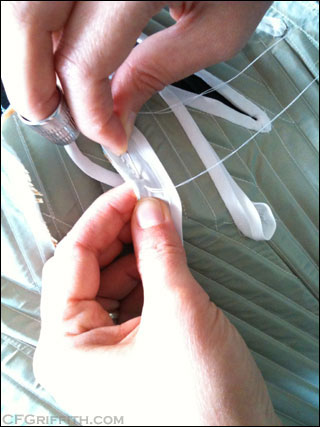
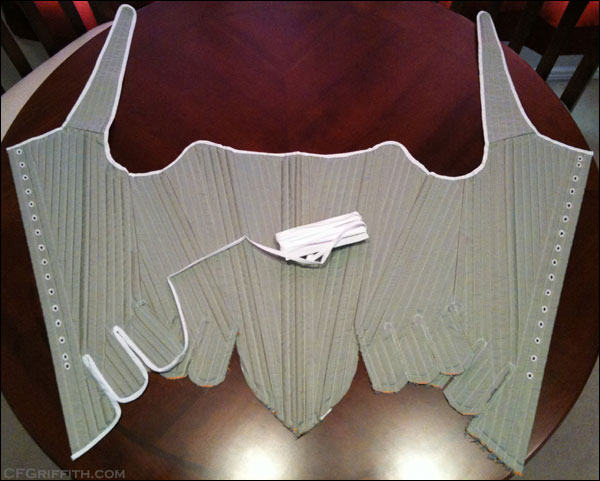
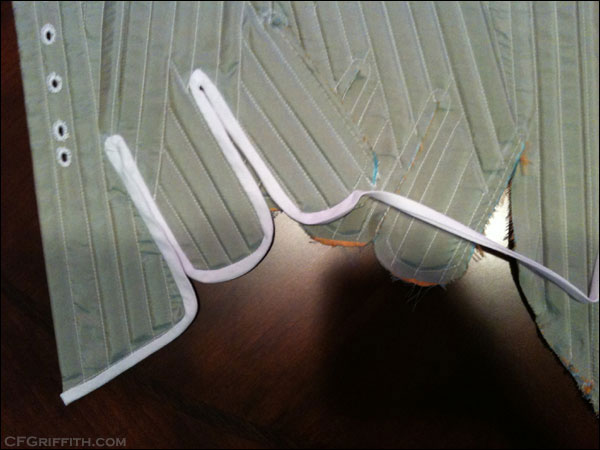
I’m currently sewing the binding on the tabs of my stays.  I’ve read people complaining about what a chore sewing the binding on the tabs is.  They’re not kidding!  I’d actually read a tip or two that mentioned you might want to start on the tabbed edge first, so the top edge would be a nice break after dealing with the tabs.  I considered it at first, but decided that I wanted to warm up by binding the top side first.  I’m glad I did.  I got a feel for how everything is working together, but I’m still slowing down in sections!
Store-bought bias tape

I decided to use store-bought tape because I need to get better tools for evenly cutting long strips of fabric.  I also would have needed to buy fabric, since I wanted to use a different color than the rest of the stays.  I’m glad I bought bias tape this time.  Honestly, it doesn’t look too bad to me (no one else is going to see it anyway), and it’s been nice to use.  I was a little nervous because I went with the thinner width, but I’ve been getting used to it.

Smooth sewing on the top edge

The top side of the stays really doesn’t have lots of sharp curves and corners, and I had plenty of room to work.  Stitching the bias tape on the front side was the part that took the longest.  I decided to use hand-sewing for attaching the binding.  I just feel like I have more control by hand, than with a machine.  When I flipped the tape over to attach it to the underside of the stays, it went much quicker.  The ends of the straps were the sharpest turns I had to deal with, and they gave me more confidence for the tabs.

The trouble with sewing around the tabs

The tabs on the other hand are close together, overlap each other in places, and the top parts of the slits where you flip the bias tape through to stitch to the back side are very crowded.  Not only am I having issues trying to keep the stitching smooth in the very tightest of turns, I feel like I’m fumbling with holding the stays to work with.  The tabs are either in the way, or waggling around.  Just when you get a comfortable position to hold everything and sew, you have to adjust it when you turn your work to sew around another corner.

The front seems to be harder to sew than the back

Fortunately, the back still goes much quicker than the front.  As long as I am able to pull and hold the bias tape evenly enough to stitch it down, it’s been going much faster.  I actually got a little paranoid thinking my work was horrific, so I stopped stitching on the front and flipped it over to stitch the back down.  I had only sewn one edge and two tabs, and I didn’t sew all the way to the end of what I’d sewn on the front (I wanted to leave a little working space). It turns out that my work wasn’t as bad as I thought.  Although I might still make a few adjustments on the top of the tab slits when I turn the tape, I think I should be able to get through this without any major errors (let’s hope, anyway).

I actually decided to continue to do both sides in sections.  I’ll sew a few tabs, and when I feel like I’m about to get sick of dealing with sewing the front part down, I’ll get to the end of my current thread, flip the stays over, and seal the back side down.  I think it might give me a bit of a break, as well as keeping things running smoothly and checking my work.

I hope it works — we’ll see soon, hopefully!

I’m still a little nervous about how the binding will work when the stays are worn.  The tabs really spread out, so I’m hoping the bias tape bunched up in the corners won’t hold everything back.  That’s part of the fit of the whole thing — the tabs have to spread for it to work.  I’m sure it will, but I tend to get a little nervous.  It would sure stink to put all this work into something, finally finish it, and then oops!  Bad fit.

Once I finish binding the bottom edge of the stays, I still have four hand-sewn eyelets to do for the straps, and I also need to finish the neckline of my shift.  Speaking of the shift, I keep kicking myself about how I set the sleeves in.  One side of me wants to take the sleeves off and do it again, and the other side is just wanting to forget about it.  I guess I’ll see how it fits when the stays are on.  I know what I should do next time.

One thing I realized with this project is every time I felt like I was potentially getting things wrong or off, I would do searches for images and either read about people’s experiences and troubles, or reassure myself that I’m doing the best I can.  The Internet is not only excellent for learning how to do things — it also helps reassure you about how you’re doing them.  At the very least, you know you’re not alone when a hard part frustrates you and it turns out many people hate sewing that part as well!

Hand-sewing the bias tape binding to the edges of the stays.

Sewing the binding around each of those tight curves is difficult. This will take a while.

Posted in Costumes, Hobbies, Sewing | Tagged , | 9 Comments

Working Through Down Times

Hand sewing the binding on the stays.

I mentioned in my last entry that I was having trouble focusing on any of my projects.  With worrying about the job situation, it’s hard to honestly care about anything else — even things that bring me so much happiness.  Once I vented my frustrations a little and explained the situation on my blog, I felt like I might be able to attempt finishing my stays.  Here is what I did to help get me back on track:

Cleared my mind

It seems silly, but it’s such a vital part of focus.  True, I didn’t realize at first that I’d been so upset and down about the job situation, but it was hanging in my subconscious enough to affect my ability to proceed with anything.

I literally had to clear my mind and realize that we were going to be just fine.  There is nothing I can do — especially worrying — that will help me right at that moment.  Christopher is doing what he has to do to find work, and I’m keeping my eyes out for any potential work as well.  We still have some savings, and although we both hate seeing those savings dwindle, we will just have to work hard to build it back up again once there is more income.

Forgot how long it’s taken

I’ve been working on these stays for way too long.  Some of the time spent was careful planning, researching, and creating a pattern (and I probably did it the hard way, knowing me).  There were many times I didn’t work on the stays so that I’d have time to think about my next step or whether I wanted to go back and fix something.  We also had travel plans we made before the layoff that made it impossible to work on the stays, even if I wanted to (I need to figure out a good travel kit that doesn’t take up too much space — but projects aren’t always at the point where you can easily carry them and hand sew — like if you’re still cutting out fabric).  Anyway, I’ve been sick of dealing with the stays and just want them to be finished!

Unfortunately, in order to achieve that wonderful feeling of a finished project, I still have more work to do.  I’ve also been dreading sewing the binding on, which will possibly be the most time-consuming and annoying step.

Took one step at a time

I had to decide which step to do first, and then focus only on that step.  I was familiar enough with what’s left to know how each step would affect the next, so I wouldn’t make any glaring errors, but I tried not to focus on all the work that was left.  I didn’t want it to overwhelm me and make me feel even worse than I already did.

I also made decisions — which may or may not have been wise, but time will tell (and I’ll learn something from it, I’m sure) — about whether or not to skip steps and cross my fingers that moving on to the next step would work for this project instead of stressing about every little thing.  Sometimes you can put too much into something and make more of a mess with it than you intended, afterall.

Remembered to enjoy the process

I need to remind myself that I do love to work on a project, and often I’m actually very sad when a project is finished.  Although I can’t wait to be finished and move on, I need to remember that I love sewing and I’m thankful that I do have something I can work on.  Maybe if I just focus on my task, I’ll get better about not dwelling on those things I have no control over.

Cut myself some slack!

The most important thing that helped me was finally realizing that regardless of how I think I feel, if I’m not in the mood to work on something due to other things dragging me down — then I shouldn’t work on it!  I wanted to sew, and thought I was just fine, but obviously there was plenty on my mind if I ended up just staring at my sewing projects and walking away disgusted and even more down.  The minute I stopped kicking myself about not sewing or doing anything else I thought I needed or wanted to, I was able to relax and approach it in a less stressed out state of mind.

So far, I’ve been working on adding the binding to my stays.  I decided to save some money and trouble and buy store-bought bias tape.  I didn’t have any fabric to make my own, and have been needing to buy a rotary cutter and cutting mat.  I’ll try making my own another time and instead be happy that I’ve saved myself a little trouble and cash.  I’m hand sewing the binding, so it’s a little slow-going, but it’s not too bad.  I’m enjoying the process again, and the minute I don’t feel like messing with it, I’ll take a break from it again.

It can be such a silly thing to worry about something as minor as sewing when there are more important things to worry about, but hobbies are an important part of our lives too.  They bring happiness and can even get our minds off stressful things.  It’s not fun when you start stressing out about things that are supposed to be relaxing and fun!  Next time I get in a rut like this, I hope I can remember these tips, and I hope they might help someone else.

Posted in Costumes, Hobbies, Sewing | Tagged , | 6 Comments

Laid Off Again

Sorry my sewing entries have slowed down again — there hasn’t been much going on project-wise.  My stays are close to being finished, but I admit I’ve not been focused enough to work on them.  I’d been very annoyed with myself for not pushing myself harder on some projects, but I realized I need to cut myself some slack.  I’ve had other things on my mind.

A month into his new job, my husband Christopher was unfortunately laid off again.  I’d been hoping to make a big push to buy the accessories and fabrics I needed, and sew like crazy to finish our costumes for the first event in November.  Understandably, there’s been a change of plans, and I doubt I will be able to finish our costumes or attend any events for a while.

I’m sure I’ll especially be sad when I see photos of the upcoming 18th Century Picnic (missing last year’s picnic is what made me realize I needed to try my best to get back to sewing).  There will be other events though, and hopefully soon, there will be another job for my husband so we both can get back on track.

Posted in Christopher, Costumes, Hobbies, Sewing | Tagged , , | 6 Comments

Happy Birthday to The Juggling Writer!

I just wanted to wish my husband a congratulations on his blog, The Juggling Writer, being a year old today!  He’s put a lot of work into it, and although the main focus is for writers who have trouble juggling everything in their lives and making time for writing, many of the things he posts could apply to non-writers as well.  Christopher, may your blog and site be around for many more years, and full of great posts and information.  Best wishes!

Posted in Blogs, Christopher, Links | Tagged , , | 2 Comments